Chat UI
Operating System:
Terminal:
Shell:
Editor:
Package Manager:
Programming Language:
Utility:
Extension:
Operating System:
Terminal:
Shell:
Editor:
Package Manager:
Programming Language:
Utility:
Extension:
Operating System:
Terminal:
Shell:
Editor:
Package Manager:
Programming Language:
Utility:
Extension:
Operating System:
Terminal:
Shell:
Editor:
Package Manager:
Programming Language:
Utility:
Extension:
Operating System:
Terminal:
Shell:
Editor:
Package Manager:
Programming Language:
Utility:
Extension:
Operating System:
Terminal:
Shell:
Editor:
Package Manager:
Programming Language:
Utility:
Extension:
UCloud Chat UI is a versatile, feature-rich, and user-friendly self-hosted web chat interface designed to function completely offline. It efficiently supports various Large Language Model (LLM) runners, including Ollama and OpenAI-compatible APIs.
The app is a customized implementation of Open WebUI.
Initialization
For guidance on utilizing the Initialization parameter, please refer to the Initialization: Bash Script section of the documentation.
Data Management
Upon the initial launch, users are prompted to import a directory from UCloud. If the directory is empty, the app will automatically create a structured folder system for storing models, caches, configurations, and more:
my_data_volume/
├── cache
|   ├── audio
│   │   └── speech
│   ├── embedding
│   │   └── models
│   ├── huggingface
│   │   └── hub
│   ├── image
│   │   └── generations
│   └── whisper
│       └── models
├── config.json
├── functions
├── models
│   ├── blobs
│   └── manifests
├── readme.txt
├── tools
├── uploads
├── vector_db
│   └── chroma.sqlite3
└── webui.db
This structured configuration is preserved for future data imports of the same data directory.
For convenience, the path to the imported data volume is stored in the DATA_DIR environment variable.
The application initiates an Ollama server on port 11434 in the backend while the frontend UI can be accessed by clicking
Backend logs are stored at /work/ollama-logs.txt.
Users can interact with the models through the frontend UI and inspect the API calls generated, which can be exported as Python, Go, TypeScript code snippets, or shell scripts.
User Authentication
Once the app's data repository is set up, users must register an admin account via the web interface. Additional accounts can be created subsequently on the same page but require admin approval to access.
The admin panel and UI settings can be accessed by clicking on the user's name at the bottom left of the web interface.
Note
To prevent unauthorized sign-ups, use the Disable signup option, which is recommended if sharing the application through a custom public link.
Model Integration
Downloading and managing LLMs is made effortless through the app's web interface. To get started, navigate to Admin Panel > Settings > Connections
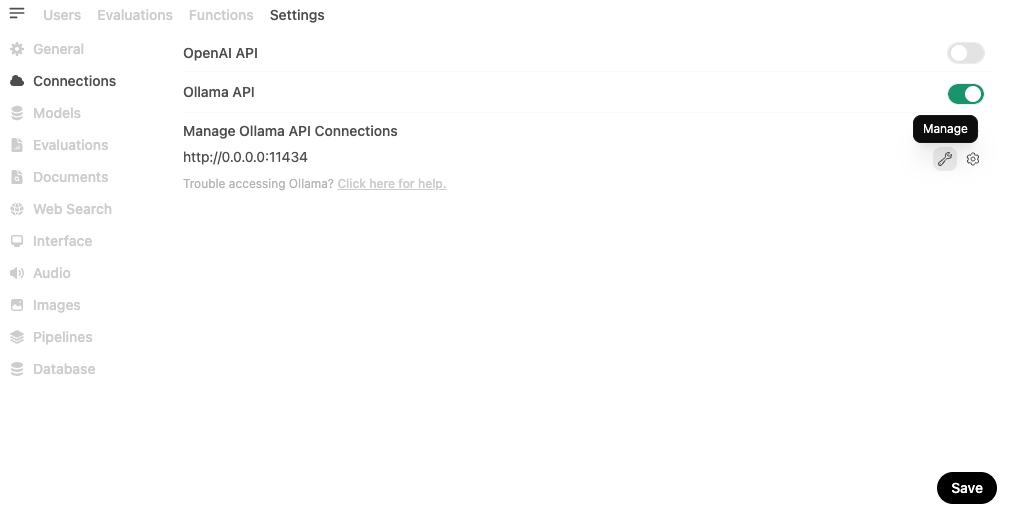
Once there, open the Ollama management settings and enter the model's name:tag as shown below:
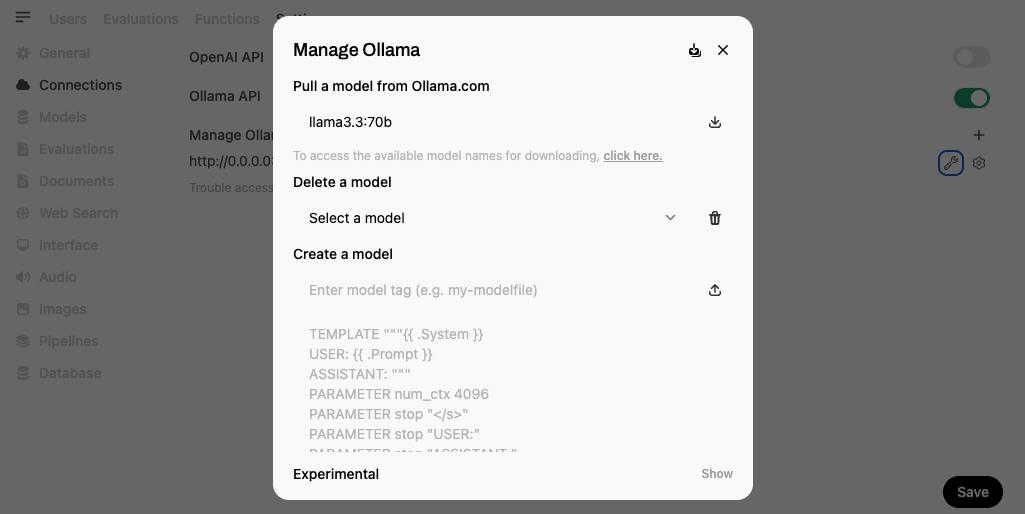
Alternatively, models can be downloaded directly via the app’s terminal using the Ollama API:
$ ollama pull llama3.3:70b
Tip
pulling manifest
pulling 4824460d29f2... 100% ▕████████████████████████████████████████▏ 42 GB
pulling 948af2743fc7... 100% ▕████████████████████████████████████████▏ 1.5 KB
pulling bc371a43ce90... 100% ▕████████████████████████████████████████▏ 7.6 KB
pulling 56bb8bd477a5... 100% ▕████████████████████████████████████████▏ 96 B
pulling c7091aa45e9b... 100% ▕████████████████████████████████████████▏ 562 B
verifying sha256 digest
writing manifest
success
By default, models are stored within the imported data volume as shown here:
my_data_volume/models/
├── blobs
│   ├── sha256-4824460d29f2058aaf6e1118a63a7a197a09bed509f0e7d4e2efb1ee273b447d
│   ├── sha256-948af2743fc78a328dcb3b0f5a31b3d75f415840fdb699e8b1235978392ecf85
│   ├── sha256-bc371a43ce90cc42fc9abb0d89a5959fbae91a53792d4dcd9b51aa48bd369b06
│   ├── sha256-53a87df39647944ad2f0a3010a1d4a60ba76a1f8d5025bb7e76986e966d28ab6
│   └── sha256-f2296999531d6120801529a45b1d103f7370c5970be939ebfc2ba5d0833e9e1e
└── manifests
    └── registry.ollama.ai
        └── library
            └── llama3.3
                └── 70b
The user can specify a different directory for models using the Import Ollama models optional parameter. The list of all models supported by Ollama is available here.
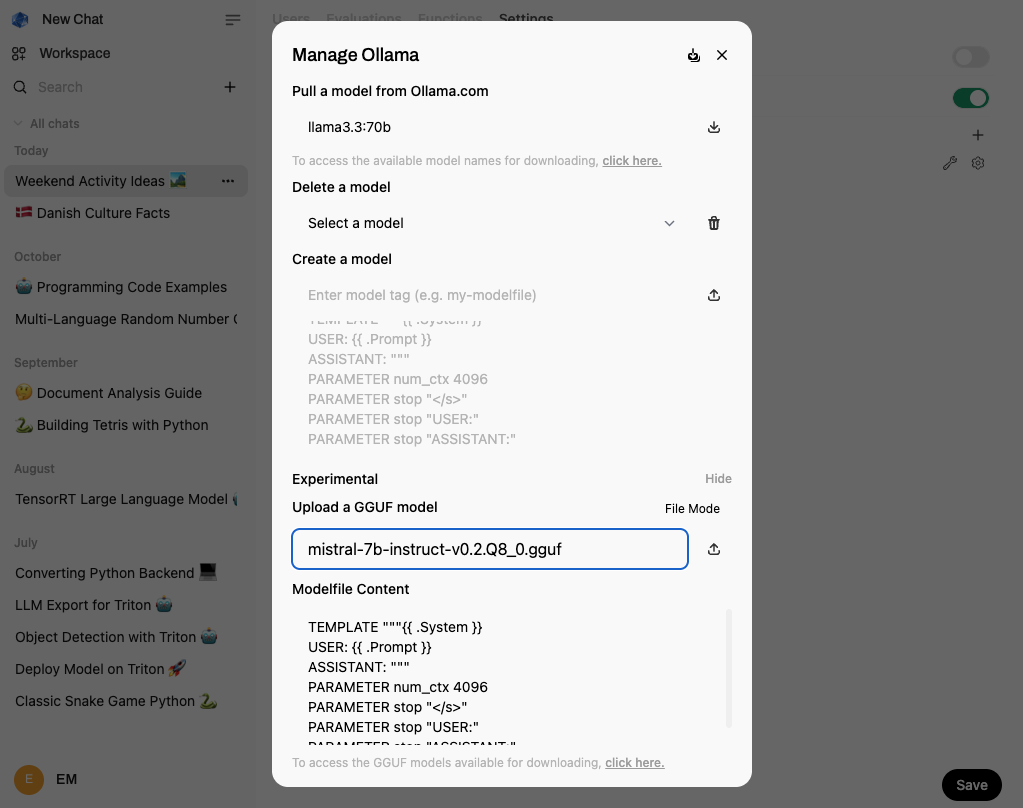
Furthermore, it is possible to upload a GGUF model file from the web interface, using this experimental feature in Settings > Models:
Hint
Click the Update All Models button located in the top-right corner of the Manage Ollama panel.
Model Loading
Once the models are integrated into the system, users can select one or more models from a drop-down menu at the top of the chat interface. This functionality is designed to provide flexibility in switching between different language models based on the user's needs and the specific tasks at hand.
The loading of a specific model can be monitored looking at the Ollama log file via the app's terminal interface, for example:
$ tail -f /work/ollama-log.txt
Tip
....................................................................................................
llama_new_context_with_model: n_ctx = 2048
llama_new_context_with_model: n_batch = 512
llama_new_context_with_model: n_ubatch = 512
llama_new_context_with_model: freq_base = 500000.0
llama_new_context_with_model: freq_scale = 1
llama_kv_cache_init: CUDA0 KV buffer size = 320.00 MiB
llama_kv_cache_init: CUDA1 KV buffer size = 320.00 MiB
llama_new_context_with_model: KV self size = 640.00 MiB, K (f16): 320.00 MiB, V (f16): 320.00 MiB
llama_new_context_with_model: CUDA_Host output buffer size = 0.52 MiB
llama_new_context_with_model: pipeline parallelism enabled (n_copies=4)
llama_new_context_with_model: CUDA0 compute buffer size = 400.01 MiB
llama_new_context_with_model: CUDA1 compute buffer size = 400.02 MiB
llama_new_context_with_model: CUDA_Host compute buffer size = 32.02 MiB
llama_new_context_with_model: graph nodes = 2566
llama_new_context_with_model: graph splits = 3
Loading time and performance considerations
Loading LLMs can be resource-intensive and time-consuming. These models require significant computational power and occupy considerable VRAM when hosted on GPU-equipped compute nodes. Users can also deploy models on CPU-based nodes, but the best performance is typically achieved on GPU nodes due to faster processing capabilities.
The time required to load a model varies based on its size and complexity, and it may take a few minutes for the LLM to be fully operational.
Troubleshooting slow load times
In instances where the model is used for the first time and appears to be stuck during loading, the recommended approach is to edit the chat prompt and resubmit it. This action typically resolves any temporary glitches and completes the loading process.
Hint
Consider enhancing the user experience by allowing a model to be pre-loaded before the app interface starts. This can be achieved by utilizing the Select Ollama model option. If the selected model isn't available in the imported repository, the system should automatically download it. This ensures that the chat interface is immediately ready for interaction, providing a smoother and more efficient user experience.
Enhanced Document Search
The app supports Retrieval Augmented Generation (RAG) with local documents and web pages, allowing for the integration of diverse content sources into chats.
Document embedding model
Users can select their preferred document embedding model via the corresponding optional parameter in the app settings. By default, the app utilizes intfloat/multilingual-e5-large from Hugging Face. However, any model supported by Sentence-Transformers can be configured for use.
When a specific model is selected, it is automatically downloaded if not already available and stored locally in:
my_data_volume/cache/embedding/
└── models
    └── models--intfloat--multilingual-e5-large
Additionally, users have the option to choose between specialized embedding models from Ollama and OpenAI directly in Admin Settings > Document:
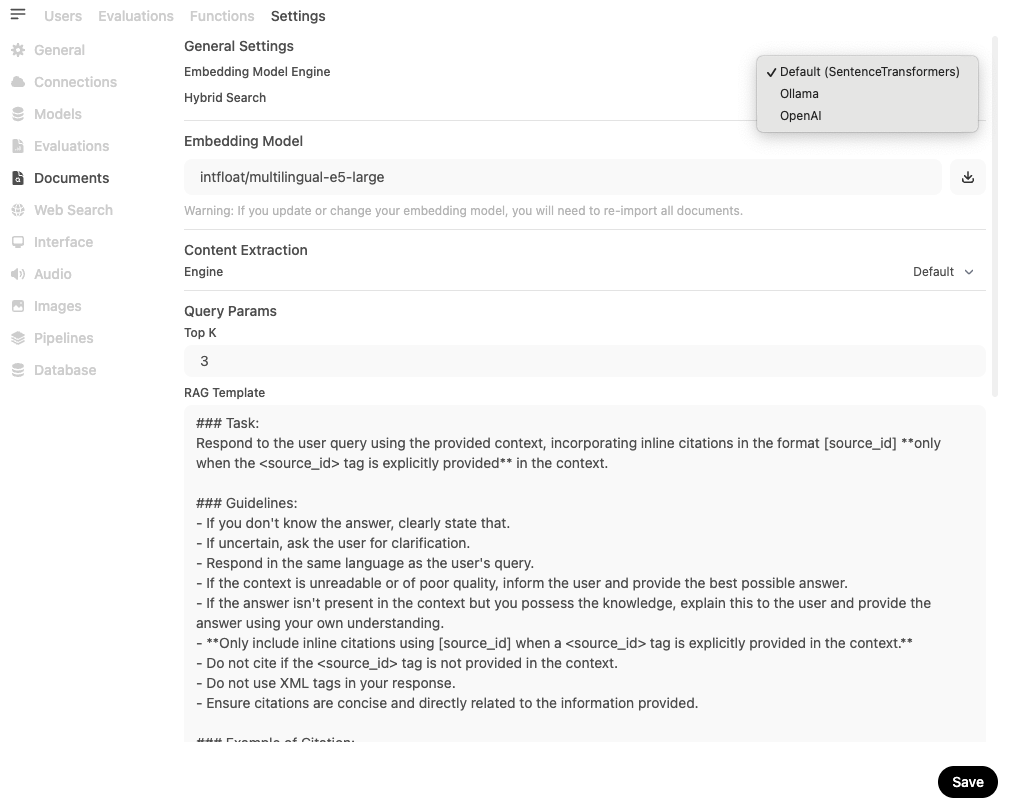
For example, available model options include:
nomic-embed-text from Ollama.
text-embedding-3-large from OpenAI.
These selections allow users to tailor the embedding functionality to better suit their linguistic and computational needs.
Important
If you change the default embedding model, you are not able to use RAG chat with your previous documents. You need to re-embed them.
Uploading documents via web interface
To enable semantic search, go to Workspaces > Knowledge in the web interface and create a new collection:
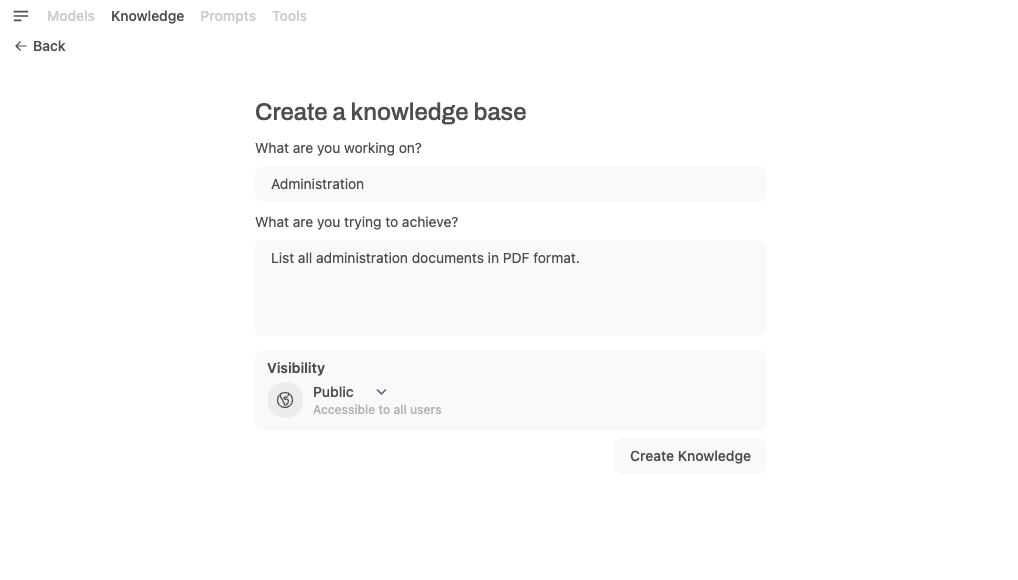
After creating the knowledge base, you can add documents through the same interface.
Tip
INFO [open_webui.apps.webui.routers.files] file.content_type: application/pdf
INFO [open_webui.apps.retrieval.main] save_docs_to_vector_db: document FrontOffice-doc.pdf file-bdac5696-c56f-4f9e-838e-1c15e5676d45
INFO [open_webui.apps.retrieval.main] adding to collection file-bdac5696-c56f-4f9e-838e-1c15e5676d45
INFO [open_webui.apps.retrieval.main] save_docs_to_vector_db: document FrontOffice-doc.pdf a3964a47-386c-456e-b675-907d6e32a1f3
INFO [open_webui.apps.retrieval.main] adding to collection a3964a47-386c-456e-b675-907d6e32a1f3
Once uploaded, documents are stored in the uploads folder within the imported data volume, as in this example:
my_data_volume/
└── uploads
    └── bdac5696-c56f-4f9e-838e-1c15e5676d45_FrontOffice-doc.pdf
Uploading documents via API
Files can also be imported from UCloud using the Chat UI document embedding API. To do this, open the app's integrated terminal and use the knowledge_base_uploader command to upload the contents of a folder (e.g., docs) to the previously created collection:
$ KNOWLEDGE_ID=a3964a47-386c-456e-b675-907d6e32a1f3 # read the ID from the output log above
$ API_KEY=sw_8d00f09541784ba7481693d280d6d5 # generate a new API KEY
$ knowledge_base_uploader --directory /work/docs --api $API_KEY --knowledge-id $KNOWLEDGE_ID
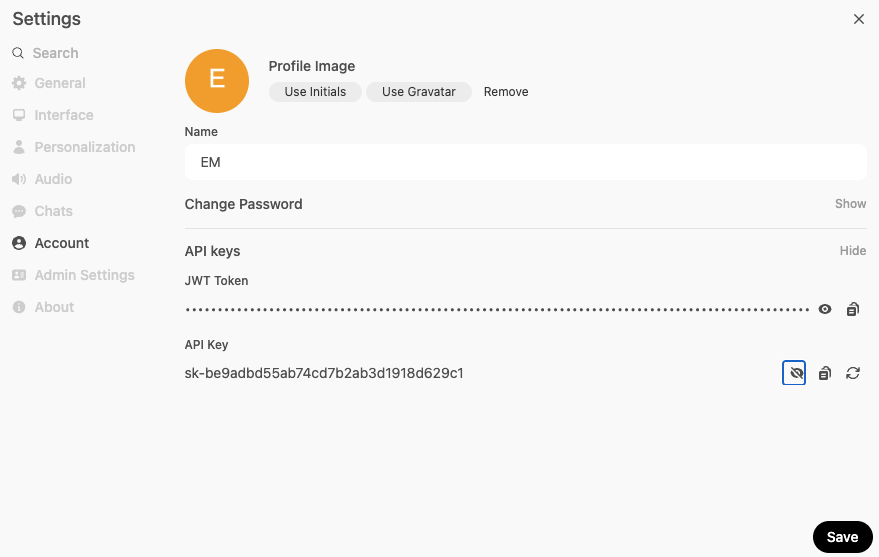
The API_KEY can be generated fronm the User > Settings > Account panel:
Sourcing external content
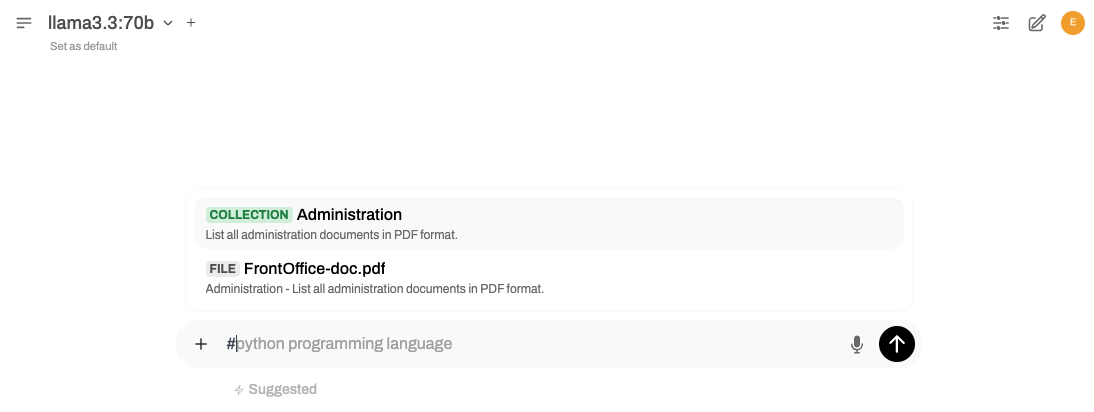
To activate RAG (Retrieval-Augmented Generation), start your prompt with the # symbol. This will display a list of available sources that can be included in your chats:
Hint
You can also source web pages by typing # followed by the target URL. The app will automatically fetch and parse the content from the URL.
Voice Input Capabilities
The app allows voice interactions with LLMs using built-in voice input support. The system auto-detects silence and can initiate responses after 3 seconds.
By default, speech-to-text transcription is executed by the built-in app's web API. Alternatively, is it possibile to use OpenAI Whisper in the backend to perform transcription locally. By default the large Whisper model is downloaded and stored in the imported data volume when the app starts:
my_data_volume/cache/whisper/
└── models
    └── models--Systran--faster-whisper-large-v3
A different Whisper model can be specified via the corresponding optional parameter in the app settings.
Image Generation Capabilities
The app integrates image generation capabilities through two backends: AUTOMATIC1111 and OpenAI DALL·E. This feature enhances the chat experience by allowing dynamic text-to-image creation.
To utilize AUTOMATIC1111, users must first activate the Enable text-to-image generation option in the app settings.
Upon activation, the app downloads the Stable Diffusion repository to the imported data folder and installs all necessary dependencies for the first time.
API activity and operational logs are maintained at /work/stable-diffusion-log.txt.
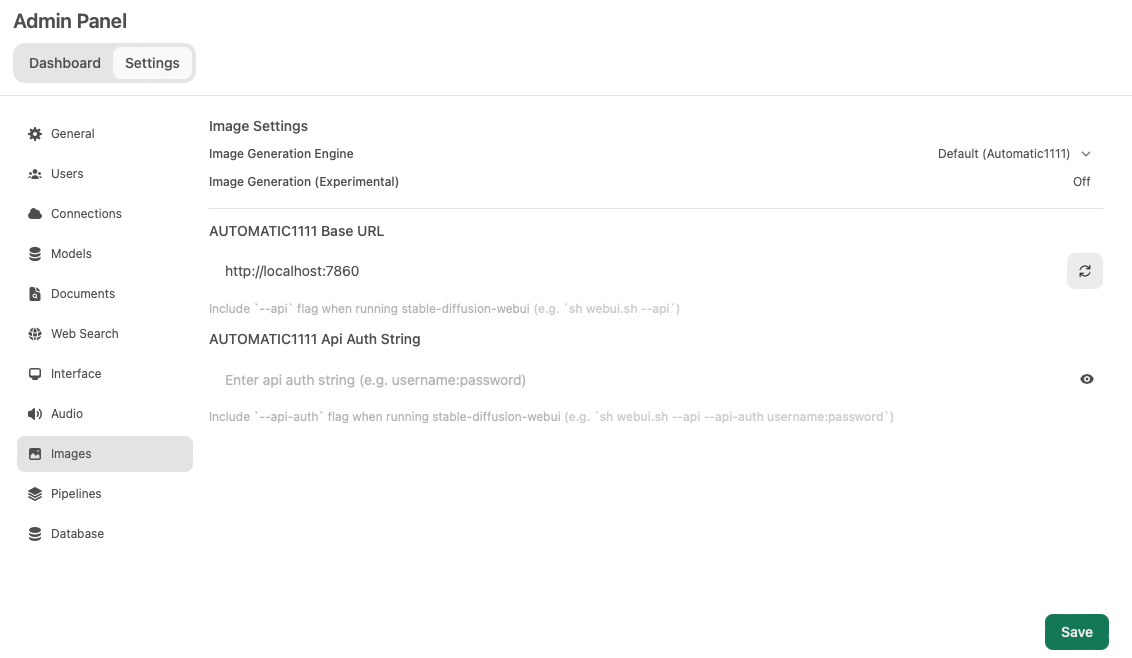
Once configured, the image generation engine is enabled by default. Users can further customize their experience by adjusting additional image configuration parameters in Settings > Images, as show here:
This functionality significantly broadens the application’s utility, making it an ideal tool for users seeking to combine textual and visual content seamlessly.
Custom Configuration
Users have the ability to fine-tune the application's behavior by modifying environmental settings through specific variables. These variables can be passed via a text file using the Local settings optional parameter in the app configuration.
For instance, by incorporating the following settings in the configuration file, users can ensure automatic updates for the RAG embedding and Whisper speech-to-text models at startup. Additionally, including the OpenAI API key enables the selection of advanced AI models such as OpenAI GPT-3.5 and GPT-4 Turbo:
# Custom app settings
OPENAI_API_KEY=<add_your_openai_api_key>

RAG_EMBEDDING_MODEL_AUTO_UPDATE=True
WHISPER_MODEL_AUTO_UPDATE=True
These configurations facilitate a more responsive and customized user experience, allowing for the integration of cutting-edge models and updates as they become available.
API Integration
The app provides seamless integration with OpenAI-compatible APIs, allowing for flexible and rich conversations alongside Ollama models, enhancing the overall user experience.
Example usage
To use the Ollama API, begin by accessing the app’s terminal interface. Here’s how to execute a command that interacts with the API:
curl http://localhost:11434/api/generate -d '{
  "model": "llama3.3:70",
  "prompt": "Write the first 10 Fibonacci numbers",
  "stream": false,
  "options": {
    "seed": 101,
    "temperature": 0
  }
}' | jq -r '.response'
Tip
% Total % Received % Xferd Average Speed Time Time Time Current
Dload Upload Total Spent Left Speed
100 992 100 810 0 182 3 0 0:04:30 0:04:21 0:00:09 256
Here are the first 10 Fibonacci numbers:
1, 1, 2, 3, 5, 8, 13, 21, 34
This command sends a request to generate responses based on the specified prompt, utilizing the already downloaded model. It demonstrates setting parameters such as seed for reproducibility and temperature to control the level of creativity in responses.
Remote API probing
For remote interactions, ensure the app is deployed with a publicly accessible link and has the frontend disabled, using the Disable UI optional parameter. This setup is particularly beneficial for server-side operations or integration with other systems in a headless environment, where the graphical user interface is not required.
When making API calls from a remote location, update the endpoint URL in your requests to reflect the actual deployment address. For instance, replace:
http://localhost:11434/api/generate
with your custom remote address, such as:
https://app-custom_link.cloud.sdu.dk/api/generate
Here, custom_link should be replaced with the specific URL name associated with your app's deployment, ensuring secure and accurate API interactions in remote setups.
Contents