MongoDB Data Management with Node.js
This tutorial guides you through setting up a web application with persistent storage, utilizing NGINX as an API gateway, Node.js for server logic, and MongoDB for database operations.
We will create a structured Node.js application on UCloud that manages users and products.
Overview: System Architecture
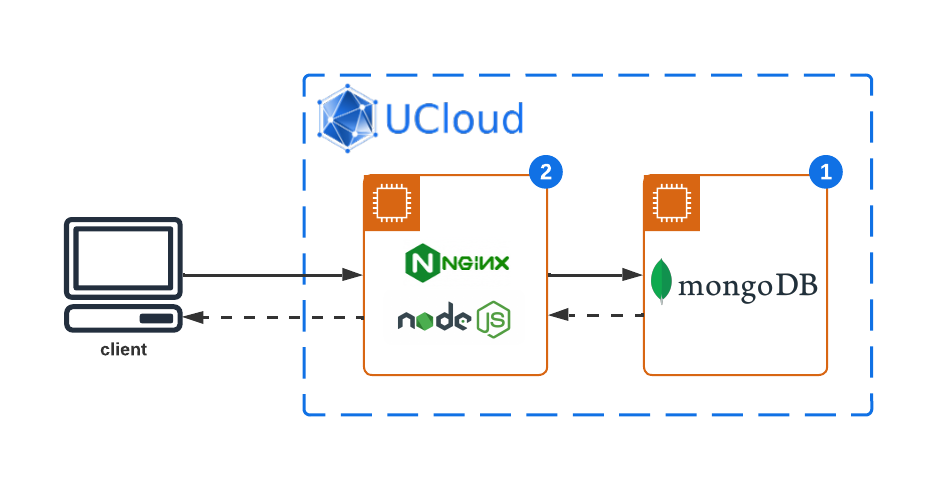
This architecture is designed to facilitate efficient data management and operations, including the creation, retrieval, updating, and deletion of user and product information. Here's a breakdown of the system components involved:
NGINX as API Gateway: Serves as the entry point for all incoming HTTP requests, efficiently routing them to the appropriate Node.js application endpoints. NGINX enhances security and manageability by abstracting the backend service details from the clients.
Node.js Application: Acts as the middle layer where business logic is executed. It handles requests forwarded by NGINX, interacts with the MongoDB database for data persistence, and sends responses back to the client.
MongoDB Database: Provides the persistent storage solution for the application, storing and managing data for users and products. MongoDB's flexible schema allows for efficient data storage and retrieval operations tailored to the application's needs.
Data Source: In this context, the data source refers to the incoming HTTP requests that carry the information to be processed and stored in the MongoDB database. These could originate from various clients, including web browsers, mobile apps, or external APIs.
This configuration is specifically tailored for applications requiring sophisticated data management capabilities, with NGINX ensuring secure and efficient client-server communication, Node.js handling server-side logic, and MongoDB providing a powerful and flexible database system.
MongoDB Setup: Database Initialization
Start a new MongoDB instance on UCloud. MongoDB automatically creates databases and collections when you first insert documents.
NGINX Configuration: API Gateway Setup
Start a new NGINX web server on UCloud with the optional parameters:
Connect to other jobs: Select the Job ID of the running MongoDB instance and specify a hostname.
Configure custom links to your application: Add a public URL which will be used to connect to the database.
In the following we will use the configuration parameters:
MongoDB hostname:
mongodb-serverPublic link:
app-mymongodb.cloud.sdu.dk
Node.js Application: Backend Setup
Open a terminal window inside the running NGINX instance and create a simple Node.js application to serve as an API for querying the database.
Project initialization
Navigate to the project directory and initialize a new Node.js project:
$ mkdir webapp && cd webapp
$ npm init -y
$ npm install express mongoose body-parser dotenv
Structure the application
Application project tree structure:
webapp/
├── db.js
├── index.js
├── models/
│   ├── Product.js
│   └── User.js
├── package.json
├── routes/
│   ├── products.js
│   └── users.js
└── .env
Database Connection:
db.jsconst mongoose = require('mongoose'); const connectDB = async () => { try { await mongoose.connect(process.env.MONGODB_URI); console.log('MongoDB connected...'); } catch (err) { console.error('Database connection error:', err.message); process.exit(1); } }; module.exports = connectDB;
Models:
models/User.js:const mongoose = require('mongoose'); const UserSchema = new mongoose.Schema({ name: String, email: String, }); module.exports = mongoose.model('User', UserSchema);
models/Product.js:const mongoose = require('mongoose'); const ProductSchema = new mongoose.Schema({ name: String, price: Number, }); module.exports = mongoose.model('Product', ProductSchema);
Routes:
routes/users.js:const express = require('express'); const router = express.Router(); const User = require('../models/User'); // Fetch all users router.get('/', async (req, res) => { try { const users = await User.find(); res.json(users); } catch (err) { res.status(500).json({ message: err.message }); } }); // Create a new user router.post('/', async (req, res) => { const user = new User({ name: req.body.name, email: req.body.email, }); try { const newUser = await user.save(); res.status(201).json(newUser); } catch (err) { res.status(400).json({ message: err.message }); } }); module.exports = router;
routes/products.js:const express = require('express'); const router = express.Router(); const Product = require('../models/Product'); // Fetch all products router.get('/', async (req, res) => { try { const products = await Product.find(); res.json(products); } catch (err) { res.status(500).json({ message: err.message }); } }); // Create a new product router.post('/', async (req, res) => { const product = new Product({ name: req.body.name, price: req.body.price, }); try { const newProduct = await product.save(); res.status(201).json(newProduct); } catch (err) { res.status(400).json({ message: err.message }); } }); module.exports = router;
Main Application:
index.jsrequire('dotenv').config(); const express = require('express'); const connectDB = require('./db'); const bodyParser = require('body-parser'); const app = express(); const PORT = process.env.PORT || 3000; // Connect to the database connectDB(); app.use(bodyParser.json()); // Use routes app.use('/api/users', require('./routes/users')); app.use('/api/products', require('./routes/products')); app.listen(PORT, () => console.log(`Server running on port ${PORT}`));
Environment configuration
Create a .env file which contains the lines:
MONGODB_URI=mongodb://username:password@mongodb-server:27017/database?authSource=admin
PORT=3000
The app is served by default on port 3000.
Note
Replace mongodb-server in the MONGODB_URI with the actual hostname of your MongoDB server, defined when starting the NGNIX instance.
Update username, password, and database strings with your MongoDB settings.
Run the application
Start the Node.js application with:
$ nohup node index &
The app runs in background.
API Routing with NGINX: Request Handling
Modify the NGINX configuration file /etc/nginx/nginx.conf to route requests:
# /etc/nginx/nginx.conf
worker_processes auto;
error_log /dev/stdout info;
pid /var/run/nginx.pid;

events {
    worker_connections 1024;
}

http {
    log_format main '$remote_addr - $remote_user [$time_local] "$request" '
                    '$status $body_bytes_sent "$http_referer" '
                    '"$http_user_agent" "$http_x_forwarded_for"';

    access_log /var/log/nginx/access.log main;

    server {

        listen 8080;
        server_name localhost;

        location /api/users {
            proxy_pass http://localhost:3000;
            proxy_http_version 1.1;
            proxy_set_header Upgrade $http_upgrade;
            proxy_set_header Connection 'upgrade';
            proxy_set_header Host $host;
            proxy_cache_bypass $http_upgrade;
        }
        location /api/products {
            proxy_pass http://localhost:3000;
            proxy_http_version 1.1;
            proxy_set_header Upgrade $http_upgrade;
            proxy_set_header Connection 'upgrade';
            proxy_set_header Host $host;
            proxy_cache_bypass $http_upgrade;
        }
    }
}
Restart NGINX to apply the changes:
$ nginx -t
$ nginx -s reload
Application Testing: Endpoint Verification
Replace app-mymongodb.cloud.sdu.dk in the commands below with your NGINX server public URL.
Create a User:
$ curl -X POST -H "Content-Type: application/json" -d '{"name": "John Doe", "email": "john@example.com"}' https://app-mymongodb.cloud.sdu.dk/api/users
Tip
{"name":"John Doe","email":"john@example.com","_id":"65db22c6679af74734b3de0e","__v":0}
Fetch Users:
$ curl https://app-mymongodb.cloud.sdu.dk/api/users
Create a Product:
$ curl -X POST -H "Content-Type: application/json" -d '{"name": "Laptop", "price": 999}' https://app-mymongodb.cloud.sdu.dk/api/products
Tip
{"name":"Laptop","price":999,"_id":"65db22fd679af74734b3de11","__v":0}
Fetch Products:
$ curl https://app-mymongodb.cloud.sdu.dk/api/products
Conclusion: Development Overview
We have built a structured web application running on UCloud capable of managing users and products, with NGINX as the front-facing API gateway and MongoDB for data storage.
Contents