MLflow Tracking Setup
MLflow is an open-source framework for managing the end-to-end machine learning lifecycle. It offers tools for tracking experiments, packaging code into reproducible runs, managing and deploying models, and integrating with diverse frameworks and storage backends while maintaining a standardized workflow. The framework includes core components for recording and organizing parameters, metrics, and artifacts across different runs. Runs can belong to the same or different experiments, facilitating result comparisons and enabling efficient model optimization.
MLflow utilizes a centralized tracking server to mange and display tracking information for various runs and experments. This server operates as a stand-alone HTTP server, offering REST APIs for accessing backend or artifact stores. It supports connections to databases such as SQLite, MySQL, or PostgreSQL for metadata storage (backend stores) and integrates with cloud storage solutions like S3, Azure Blob and MinIO for handling larger files, including datasets, images and models (artifact stores). Furthermore, MLflow's tracking API supports multiple programming languages and interfaces, including Python, REST, R, and Java.
The following sections outline the process of setting up an MLflow tracking server to monitor and log a Python experiment in a PyTorch instance running on UCloud. Additionally, a reverse proxy will be configured using the NGINX web server app to access the tracking server's UI. the experiment's metadata can be stored in a MySQL database, while artifacts can be saved in a MinIO bucket.
Note
MLflow also allows tracking system metrics, such as CPU, GPU, and memory usage, during a run.
Setup
The overall system arichitecture is illustrated in the following diagram.
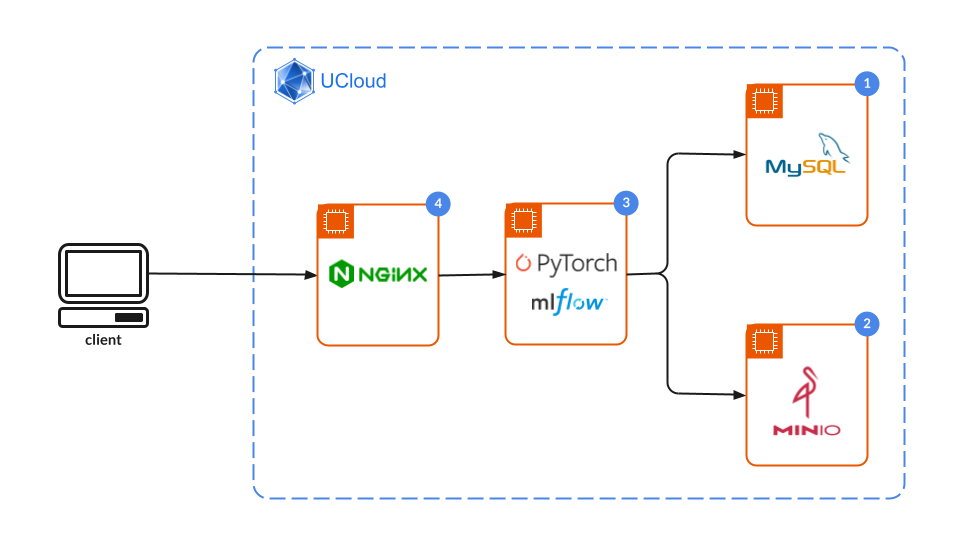
MySQL backend server
Setting up a backend store is optional, as metadata is saved locally by default in the mlruns directory of the machine hosting the tracking server.
However, using a dedicated database backend, such as MySQL, can enhance data management and scalability, particularly for larger or collaborative projects.
To configure a MySQL backend server:
Create a new MySQL instance on UCloud.
Configure the database and user: Connect to the MySQL server and execute the following SQL commands to create a database, a user, and grant the necessary privileges:
CREATE DATABASE mlflow_db;
CREATE USER 'mlflow_user'@'%' IDENTIFIED BY 'password';
GRANT ALL PRIVILEGES ON mlflow_db.* TO 'mlflow_user'@'%';
FLUSH PRIVILEGES;
EXIT;
Database name:
mlflow_dbUser:
mlflow_userPassword:
password
MinIO artifact server
Setting up an artifact store, such as MinIO, is optional but highly advantageous for managing larger files and ensuring scalability.
By default, artifacts are saved locally in mlartifacts, which works well for simple use cases but may become inefficient for larger projects.
Steps to set up a MinIO artifact store:
Create a new MinIO server instance: The admin credentials for MinIO will be displayed in the job console and will be needed later for configuration.
Create a bucket for artifacts:
Open a job terminal in the MinIO server environment and create the bucket
mlflow-bucketinside the mounted object storage volume with the following command:$ mc mb /work/<object-storage-volume>/mlflow-bucket
Replace
<object-storage-volume>with the appropriate path for the mounted storage volume.
Alternative method via MinIO console:
Log in to the MinIO console using the admin credentials.
Navigate to Buckets and click on Create Bucket.
Enter
mlflow-bucketas the bucket name and save.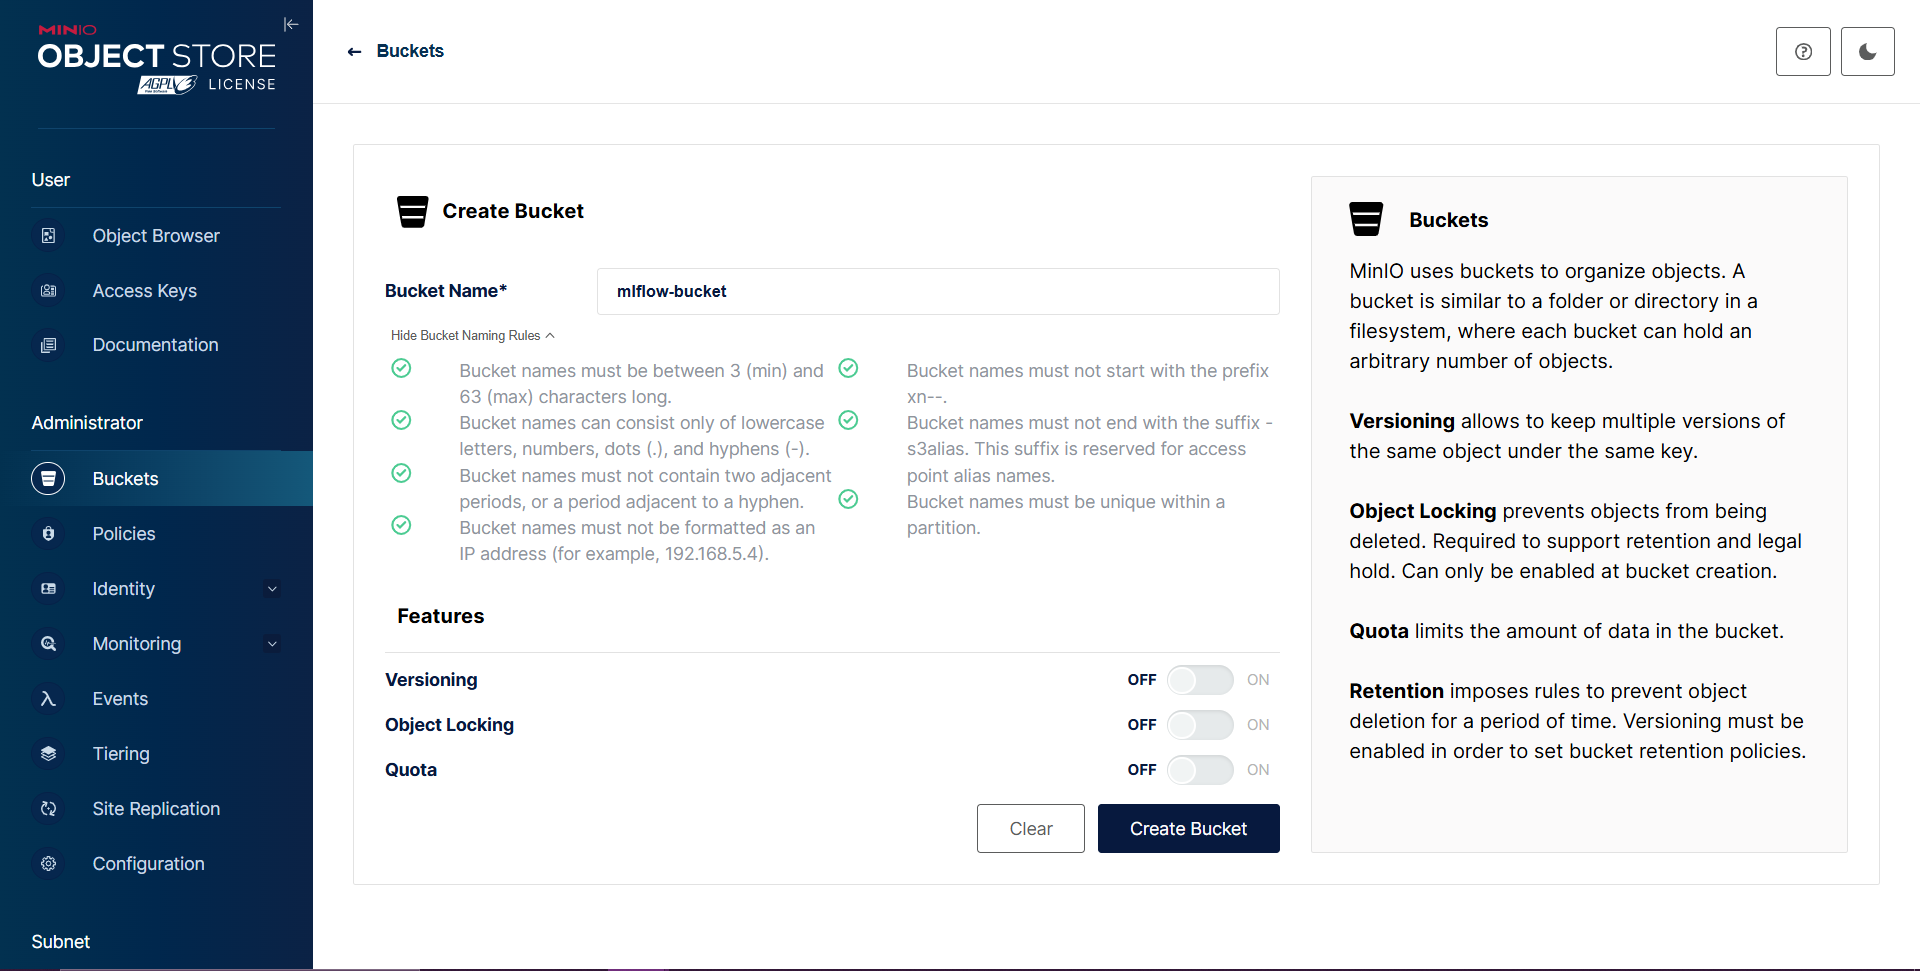
MLflow tracking server
Create a new PyTorch instance: If a backend and/or artifact store is configured, connect the Pytorch instance to each service, specifying a hostnames.
Install MLflow: Once the PyTorch job starts, open the job terminal interface and install MLflow using the following command:
$ pip install mlflow
Note
If using a backend or artifact store, additional Python libraries are required:
For MySQL:
pymysql(MySQL driver for Python)For MinIO:
boto3(AWS SDK for Python)For PostgreSQL:
psycopg2(PostgreSQL driver for Python)
Start the MLflow Tracking Server:
Without a backend or artifact store: Start the server using:
$ mlflow server --host "0.0.0.0" --port 8080
With MinIO (artifact store): First, set up the required environment variables:
AWS_ACCESS_KEY_ID: MinIO username from the job console.AWS_SECRET_ACCESS_KEY: MinIO password from the job console.MLFLOW_S3_ENDPOINT_URL: The MinIO endpoint.
Example commands:
$ export MLFLOW_S3_ENDPOINT_URL=http://minio:9000 # 'minio' is the hostname of the connected MinIO instance
$ export AWS_ACCESS_KEY_ID=<your-minio-access-key>
$ export AWS_SECRET_ACCESS_KEY=<your-minio-secret-key>
$ mlflow server --host "0.0.0.0" --port 8080 --default-artifact-root s3://mlflow-bucket # 'mlflow-bucket' is the backet on the connected MinIO instance
With MySQL (backend store): Specify the backend store URI in the server startup command:
$ mlflow server --host "0.0.0.0" --port 8080 --backend-store-uri mysql+pymysql://mlflow_user:password@mysql:3306/mlflow_db # 'mysql' is hostname for the connected MySQL instance
With both backend and artifact stores: Combine the relevant commands:
$ export MLFLOW_S3_ENDPOINT_URL=http://minio:9000
$ export AWS_ACCESS_KEY_ID=<your-minio-access-key>
$ export AWS_SECRET_ACCESS_KEY=<your-minio-secret-key>
$ mlflow server --host "0.0.0.0" --port 8080 --backend-store-uri mysql+pymysql://mlflow_user:password@mysql:3306/mlflow_db --default-artifact-root s3://mlflow-bucket
Keep the Server Running: Use a session manager like tmux,
screenornohupto ensure the server remains active in the background.
NGINX reverse proxy
The following steps outline how to configure NGINX as a reverse proxy to access the MLflow tracking server UI:
Create a new NGINX instance: Connect it to the PyTorch job running the MLflow tracking server.
Configure the NGINX server:
Open the NGINX job terminal interface and edit the
/etc/nginx/nginx.conffile. Modify its content to set up a reverse proxy (see, e.g., this tutorial). Replacepytorchwith the hostname of the PyTorch instance and ensure the port matches the one used by the MLflow tracking server (default:8080):worker_processes auto; error_log /var/log/nginx/error.log notice; pid /var/run/nginx.pid; events { worker_connections 1024; } stream { upstream pytorch_backend { server pytorch:8080; # Replace with Pytorch app's hostname and the port that the MLflow tracking server is using } server { listen 8080; # Listen on IPv4 listen [::]:8080; # Listen on IPv6 proxy_pass pytorch_backend; } }
Apply and verify the configuration:
Save the changes to the
nginx.conffile.Restart the NGINX service to apply the new configuration:
nginx -t
nginx -s reload
Verify that the NGINX reverse proxy is functioning correctly by accessing the MLflow tracking server UI through the NGINX app interface.
Python Experiment
This example demonstrates the integration of MLflow with PyTorch, following the official PyTorch quickstart guide.
Note
The example can be downloaded directly from the official guide. However, the provided tracking_uri must be updated to http://localhost:8080.
Prerequisites
Install required libraries: On the PyTorch instance, install the following dependencies:
$ pip install torchmetrics torchinfo
Set environment variables: If running in a Jupyter Notebook and using MinIO for artifact storage, import the environment variables:
%env MLFLOW_S3_ENDPOINT_URL=http://<minio-server-name>:9000
%env AWS_ACCESS_KEY_ID=<your-minio-access-key>
%env AWS_SECRET_ACCESS_KEY=<your-minio-secret-key>
Python script
The provided Python script trains and evaluates a PyTorch model while logging training parameters, metrics, and artifacts to MLflow. Key steps include:
Data loading: Load the FashionMNIST dataset.
Model definition: Define a simple convolutional neural network for image classification.
Training and evaluation: Train the model over multiple epochs, log metrics to MLflow, and evaluate performance.
Logging with MLflow:
Log parameters, metrics, and model artifacts.
Save the trained model for later use.
The MLflow experiment setup is defined with the following script:
import torch
from torch import nn
from torch.utils.data import DataLoader
from torchinfo import summary
from torchmetrics import Accuracy
from torchvision import datasets
from torchvision.transforms import ToTensor

import mlflow
mlflow.set_tracking_uri(uri="http://localhost:8080")
mlflow.set_experiment("/mlflow-pytorch-quickstart")


training_data = datasets.FashionMNIST(
    root="data",
    train=True,
    download=True,
    transform=ToTensor(),
)

test_data = datasets.FashionMNIST(
    root="data",
    train=False,
    download=True,
    transform=ToTensor(),
)

train_dataloader = DataLoader(training_data, batch_size=64)
test_dataloader = DataLoader(test_data, batch_size=64)

class ImageClassifier(nn.Module):
    def __init__(self):
        super().__init__()
        self.model = nn.Sequential(
            nn.Conv2d(1, 8, kernel_size=3),
            nn.ReLU(),
            nn.Conv2d(8, 16, kernel_size=3),
            nn.ReLU(),
            nn.Flatten(),
            nn.LazyLinear(10),  # 10 classes in total.
        )

    def forward(self, x):
        return self.model(x)

device = "cuda" if torch.cuda.is_available() else "cpu"

def train(dataloader, model, loss_fn, metrics_fn, optimizer, epoch):
    """Train the model on a single pass of the dataloader.

    Args:
        dataloader: an instance of `torch.utils.data.DataLoader`, containing the training data.
        model: an instance of `torch.nn.Module`, the model to be trained.
        loss_fn: a callable, the loss function.
        metrics_fn: a callable, the metrics function.
        optimizer: an instance of `torch.optim.Optimizer`, the optimizer used for training.
        epoch: an integer, the current epoch number.
    """
    model.train()
    for batch, (X, y) in enumerate(dataloader):
        X, y = X.to(device), y.to(device)

        pred = model(X)
        loss = loss_fn(pred, y)
        accuracy = metrics_fn(pred, y)

        # Backpropagation.
        loss.backward()
        optimizer.step()
        optimizer.zero_grad()

        if batch % 100 == 0:
            loss, current = loss.item(), batch
            step = batch // 100 * (epoch + 1)
            mlflow.log_metric("loss", f"{loss:2f}", step=step)
            mlflow.log_metric("accuracy", f"{accuracy:2f}", step=step)
            print(f"loss: {loss:2f} accuracy: {accuracy:2f} [{current} / {len(dataloader)}]")

def evaluate(dataloader, model, loss_fn, metrics_fn, epoch):
    """Evaluate the model on a single pass of the dataloader.

    Args:
        dataloader: an instance of `torch.utils.data.DataLoader`, containing the eval data.
        model: an instance of `torch.nn.Module`, the model to be trained.
        loss_fn: a callable, the loss function.
        metrics_fn: a callable, the metrics function.
        epoch: an integer, the current epoch number.
    """
    num_batches = len(dataloader)
    model.eval()
    eval_loss, eval_accuracy = 0, 0
    with torch.no_grad():
        for X, y in dataloader:
            X, y = X.to(device), y.to(device)
            pred = model(X)
            eval_loss += loss_fn(pred, y).item()
            eval_accuracy += metrics_fn(pred, y)

    eval_loss /= num_batches
    eval_accuracy /= num_batches
    mlflow.log_metric("eval_loss", f"{eval_loss:2f}", step=epoch)
    mlflow.log_metric("eval_accuracy", f"{eval_accuracy:2f}", step=epoch)

    print(f"Eval metrics: \nAccuracy: {eval_accuracy:.2f}, Avg loss: {eval_loss:2f} \n")

# Start training
epochs = 3
loss_fn = nn.CrossEntropyLoss()
metric_fn = Accuracy(task="multiclass", num_classes=10).to(device)
model = ImageClassifier().to(device)
optimizer = torch.optim.SGD(model.parameters(), lr=1e-3)

with mlflow.start_run() as run:
    params = {
        "epochs": epochs,
        "learning_rate": 1e-3,
        "batch_size": 64,
        "loss_function": loss_fn.__class__.__name__,
        "metric_function": metric_fn.__class__.__name__,
        "optimizer": "SGD",
    }
    # Log training parameters.
    mlflow.log_params(params)

    # Log model summary.
    with open("model_summary.txt", "w") as f:
        f.write(str(summary(model)))
    mlflow.log_artifact("model_summary.txt")

    for t in range(epochs):
        print(f"Epoch {t+1}\n-------------------------------")
        train(train_dataloader, model, loss_fn, metric_fn, optimizer, epoch=t)
        evaluate(test_dataloader, model, loss_fn, metric_fn, epoch=0)

    # Save the trained model to MLflow.
    mlflow.pytorch.log_model(model, "model")

logged_model = f"runs:/{run.info.run_id}/model"
loaded_model = mlflow.pyfunc.load_model(logged_model)

outputs = loaded_model.predict(training_data[0][0][None, :].numpy())
Accessing results
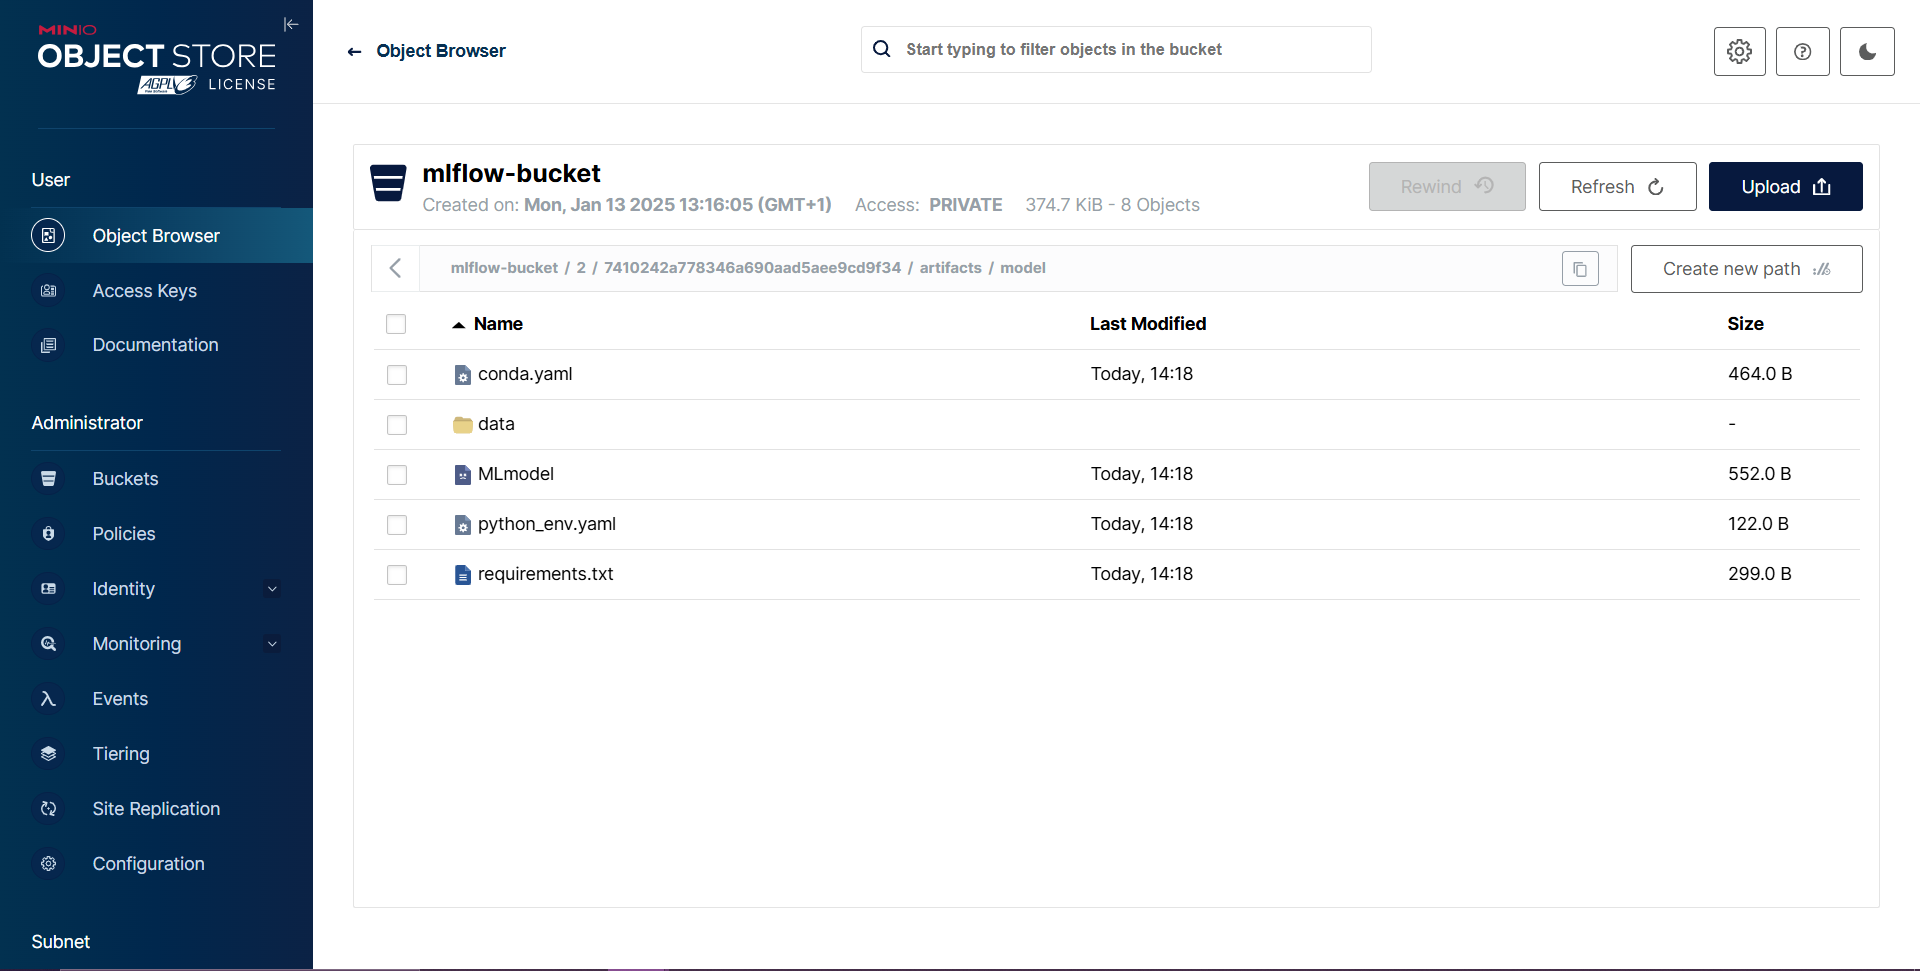
Data in artifact stores: If MinIO is configured as the artifact store, all logs and models are accessible via the MinIO bucket:
MLflow UI via NGINX: Use the MLflow interface to explore experiment metadata, parameters, metrics, and logged artifacts:
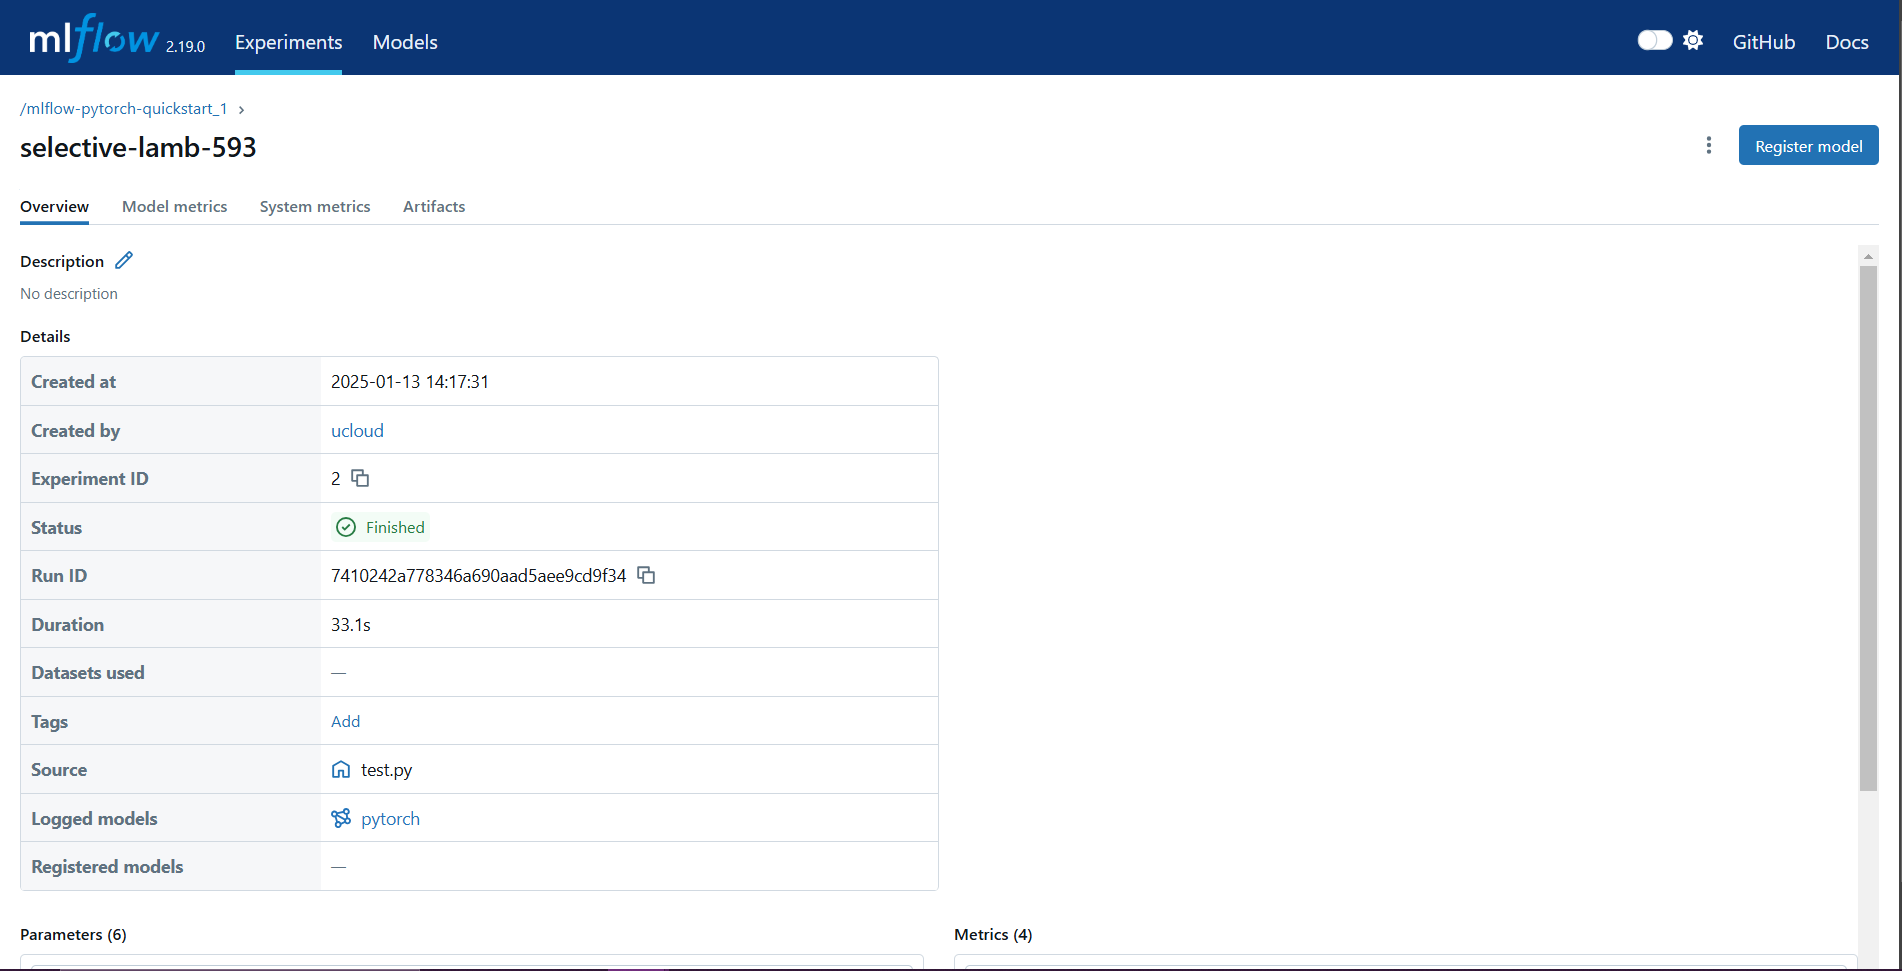
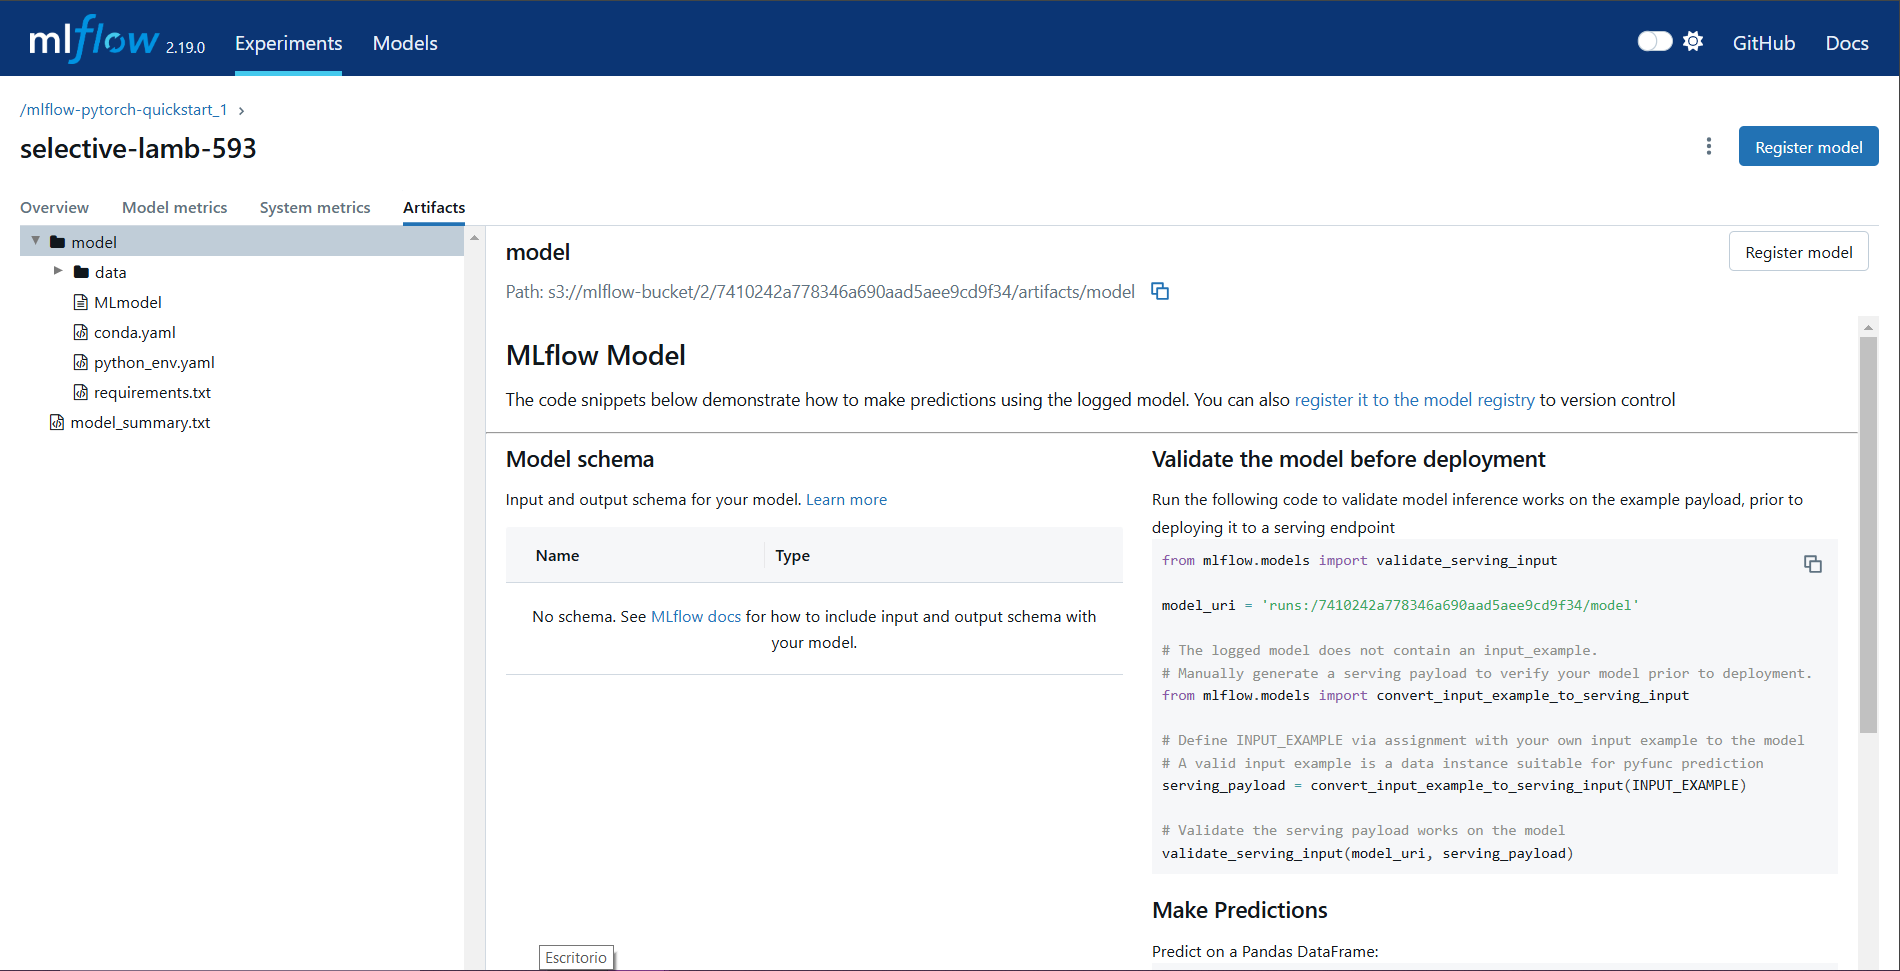
By following this workflow, the experiment integrates seamlessly with MLflow, ensuring comprehensive tracking and storage of all relevant data.
Contents