Change Data Capture System
This tutorial guides you through setting up a Change Data Capture (CDC) system on UCloud utilizing Redis Pub/Sub for real-time data streaming, MinIO for object storage, Node.js for backend logic, and NGINX acting as the gateway.
The application simulates CDC by channeling data via HTTP POST requests through NGINX to a MinIO object storage bucket, and then publishing a notification to a Redis channel indicating that new data has been stored.
Architecture Overview: Streamlined data capture and storage
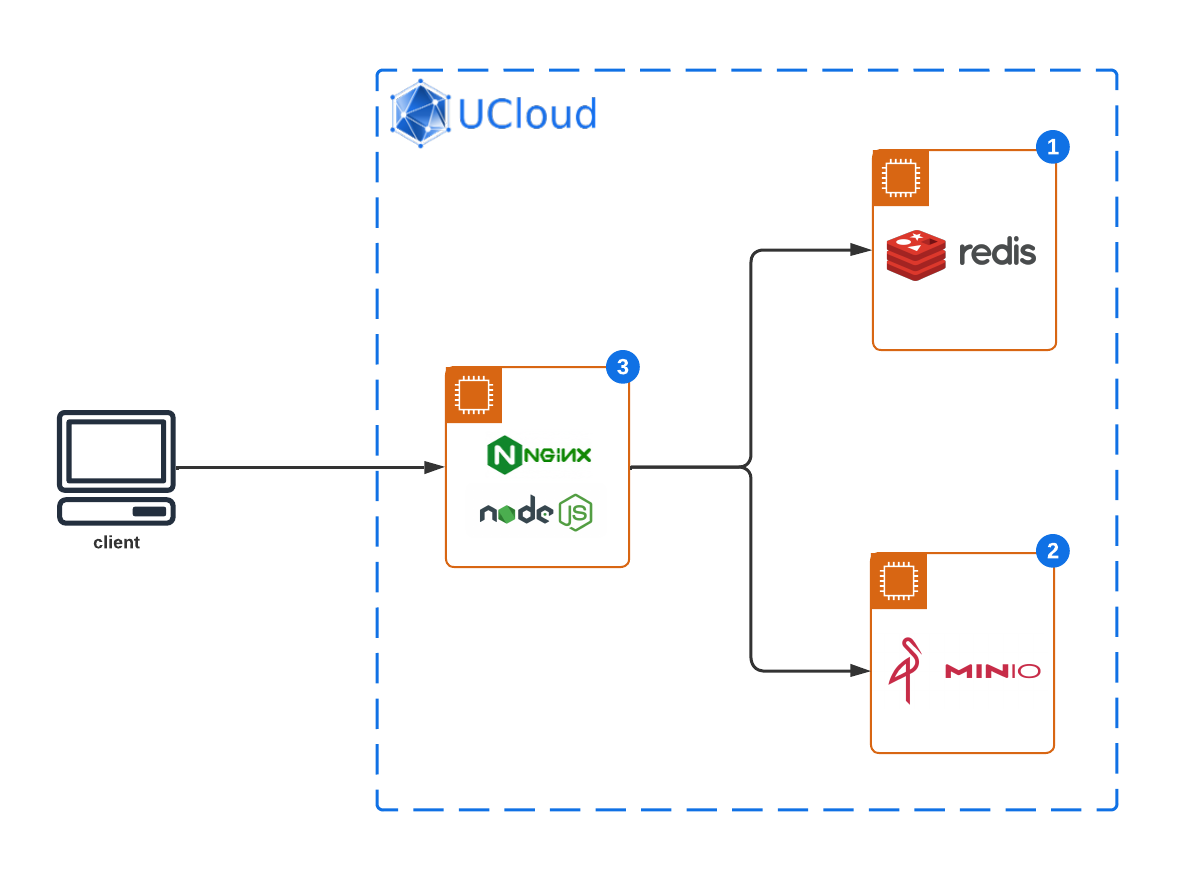
This system is engineered to facilitate real-time data streaming, leveraging a combination of Redis Pub/Sub for message passing, MinIO for secure and scalable object storage, Node.js for robust backend processing, and NGINX as the pivotal gateway for managing and directing data streams. Here's a breakdown of the system components:
NGINX Gateway: Serves as the entry point for incoming data streams and acts as a reverse proxy, directing the data to the Node.js application. NGINX is configured to efficiently handle HTTP connections and forward them to the appropriate processing applications.
Redis Pub/Sub: Utilized for its robust messaging system that facilitates real-time data streaming. Redis Pub/Sub channels are employed to broadcast data streams to subscribed clients, in this case, the Node.js application, ensuring low-latency communication.
MinIO Object Storage: Provides scalable and secure object storage for processed data. The Node.js application stores the incoming data streams into MinIO buckets after necessary processing, allowing for persistent and accessible data storage.
Node.js Application: Positioned to receive data streams from NGINX, subscribe to Redis channels for real-time data, process the incoming data as per business logic, and finally store the processed data in MinIO. This backend application forms the core of the CDC system, orchestrating data flow and transformation.
This CDC system is architected to provide a resilient and scalable solution for real-time data processing and storage. It is ideal for scenarios requiring immediate data capture and storage, such as event logging, analytics, and real-time monitoring. The integration of these components forms a robust pipeline that ensures data integrity, minimizes latency, and maximizes the efficiency of data handling processes.
Redis for CDC: Setting up Pub/Sub
Start a new Redis server on UCloud.
Redis is utilized for its Pub/Sub features, acting as the intermediary for data handling. No additional configuration is required for Redis Pub/Sub functionality beyond default installation.
MinIO Integration: Implementing data storage
Start a new MinIO object storage server on UCloud.
Confirm MinIO operational status. We will need the MinIO server endpoint, alongside the access and secret keys, to configure Node.js for storage tasks.
Initialization: Setting up NGINX
Start a new NGINX web server on UCloud with the optional parameters:
Connect to other jobs: Select the Job ID of the running Redis instance and specify a hostname.
Connect to other jobs: Select the Job ID of the running MinIO instance and specify a hostname.
Configure custom links to your application: Add a public URL which will be used to connect to the data store.
In the following we will fix the configuration parameters:
Redis hostname:
redis-serverMinIO hostname:
minio-serverPublic link:
app-mycdc.cloud.sdu.dk
Node.js Processing: Building the application
This application subscribes to Redis channels, processes incoming data, and stores it in MinIO.
Project initialization
On the NGINX server open a terminal window and run the commands:
$ mkdir cdc_project && cd cdc_project
$ npm init -y
$ npm install express dotenv minio redis
Application script
Create a file app.js in the project directory, incorporating Redis subscriptions and MinIO storage operations:
require('dotenv').config();
const express = require('express');
const Redis = require('redis');
const { Client: MinioClient } = require('minio');
const app = express();
const PORT = 3000; // Port where the Node.js app will listen

// Body Parser Middleware to handle JSON payloads
app.use(express.json());

// Environment variables for service endpoints and credentials
const MINIO_ENDPOINT = process.env.MINIO_ENDPOINT || 'minio-server';
const REDIS_HOST = process.env.REDIS_HOST || 'redis-server';
const REDIS_PORT = parseInt(process.env.REDIS_PORT) || 6379;
const BUCKET_NAME = process.env.BUCKET_NAME || 'cdc-data';
const MINIO_PORT = parseInt(process.env.MINIO_PORT) || 9000;
const MINIO_ACCESS_KEY = process.env.MINIO_ACCESS_KEY;
const MINIO_SECRET_KEY = process.env.MINIO_SECRET_KEY;
const MINIO_BUCKET_NAME = process.env.BUCKET_NAME || 'cdc-data';

// MinIO client setup
const minioClient = new MinioClient({
    endPoint: MINIO_ENDPOINT,
    port: MINIO_PORT,
    useSSL: false,
    accessKey: MINIO_ACCESS_KEY,
    secretKey: MINIO_SECRET_KEY
});

// Persistent Redis client setup
const redisClient = Redis.createClient({
    url: `redis://${REDIS_HOST}:${REDIS_PORT}`
});

redisClient.on('error', (err) => console.log('Redis Client Error', err));
redisClient.connect();

// Ensure the bucket exists in MinIO
minioClient.bucketExists(MINIO_BUCKET_NAME, function(err, exists) {
    if (err) {
        console.log('Error checking bucket existence', err);
        return;
    }
    if (!exists) {
        minioClient.makeBucket(MINIO_BUCKET_NAME, 'eu-north-0', err => {
            if (err) return console.log('Bucket creation error', err);
            console.log('Bucket created successfully in MinIO.');
        });
    }
});

// HTTP POST endpoint to receive data
app.post('/data', (req, res) => {
    const message = JSON.stringify(req.body); // Convert the payload to a string
    const objectName = `data-${Date.now()}.txt`;
    minioClient.putObject(MINIO_BUCKET_NAME, objectName, message, err => {
        if (err) {
            console.log('Error storing message in MinIO', err);
            return res.status(500).send('Error storing message in MinIO');
        }
        console.log(`Message stored in MinIO: ${objectName}`);
        // Publish a message to Redis after storing in MinIO
        redisClient.publish('nginxData', `New data stored in MinIO: ${objectName}`)
            .then(() => console.log(`Published to Redis: New data stored in MinIO: ${objectName}`))
            .catch(err => console.log('Redis publish error:', err));
        res.send(`Message stored: ${objectName}`);
    });
});

app.listen(PORT, () => {
    console.log(`Node.js app listening on port ${PORT}`);
});
Create a .env file in the root directory of your project and add your environment variables:
MINIO_ACCESS_KEY=<username>
MINIO_SECRET_KEY=<password>
MINIO_ENDPOINT=minio-server
MINIO_BUCKET_NAME=cdc-data
REDIS_HOST=redis-server
The app is served by default on port 3000. Data is transferred to the MinIO bucket cdc-data.
Note
Replace minio-server and redis-server in .env with the actual hostname of your MinIO and Redis servers, defined when starting the NGNIX instance.
Also, update your MinIO login credentials.
Run the application
Start the Node.js application with:
$ nohup node app &
The app runs in background.
NGINX Routing: Configuring data paths
Modify the NGINX configuration file /etc/nginx/nginx.conf to add an HTTP server block for redirecting incoming data towards the Node.js backend:
# /etc/nginx/nginx.conf
worker_processes  auto; # Auto-adjusts to the number of CPU cores
error_log /var/log/nginx/error.log info; # Logging level set to info for debugging
pid       /var/run/nginx.pid;

events {
    worker_connections  1024; # Max number of connections per worker process
}

http {
    # Basic HTTP settings
    sendfile on; # Enable high-performance file serving
    tcp_nopush on; # Send HTTP header in one packet
    tcp_nodelay on; # Disable the Nagle buffering algorithm
    keepalive_timeout 65; # Keep-alive timeout
    types_hash_max_size 2048; # Increase hash table size for MIME types

    include       /etc/nginx/mime.types; # MIME types file
    default_type  application/octet-stream; # Default MIME type

    # Logging settings
    log_format  main  '$remote_addr - $remote_user [$time_local] "$request" '
                      '$status $body_bytes_sent "$http_referer" '
                      '"$http_user_agent" "$http_x_forwarded_for"';
    access_log  /var/log/nginx/access.log  main;

    # Gzip compression settings
    gzip on; # Enable gzip compression
    gzip_disable "msie6"; # Disable for IE6
    gzip_vary on; # Vary header for proxies
    gzip_proxied any; # Enable for any proxy requests
    gzip_comp_level 6; # Compression level (1-9)
    gzip_buffers 16 8k; # Buffers for compression
    gzip_http_version 1.1; # Minimum HTTP version
    gzip_types text/plain text/css application/json application/javascript text/xml application/xml application/xml+rss text/javascript;

    # Server configuration
    server {
        listen 8080;

        # Location block for the API
        location / {
            # Reverse proxy and pass requests to the Node.js application
            proxy_pass http://localhost:3000; # Ensure this points to your Node.js app

            # Header adjustments for reverse proxy
            proxy_set_header Host $host; # Pass the host header
            proxy_set_header X-Real-IP $remote_addr; # Pass the real client IP
            proxy_set_header X-Forwarded-For $proxy_add_x_forwarded_for; # Forwards the real client IP
            proxy_set_header X-Forwarded-Proto $scheme; # Pass the actual scheme

            # WebSocket support
            proxy_http_version 1.1; # Use HTTP/1.1
            proxy_set_header Upgrade $http_upgrade; # Allow WebSockets
            proxy_set_header Connection "upgrade"; # Allow WebSockets

            # Disable buffering for SSE (Server-Sent Events) or WebSocket connections
            proxy_buffering off;

            # Other proxy settings
            proxy_connect_timeout 60s; # Timeout for establishing a connection
            proxy_send_timeout 60s; # Timeout for transmitting a request to the proxied server
            proxy_read_timeout 60s; # Timeout for reading a response from the proxied server
        }
    }
}
Restart NGINX to apply the changes:
$ nginx -t
$ nginx -s reload
System Testing: Validating CDC
Test the setup by sending data via NGINX, storing it in a MinIO bucket and publishing notifications to a Redis channel.
Data transmission:
$ curl -X POST -H "Content-Type: application/json" -d '{"message": "Test message"}' https://app-mycdc.cloud.sdu.dk/data
Tip
Message stored: data-1709043498828.txt
Replace
app-mycdc.cloud.sdu.dkwith your NGINX server public URL.Data verification in MinIO:
Inspect the MinIO bucket
cdc-datafor the new object with the message.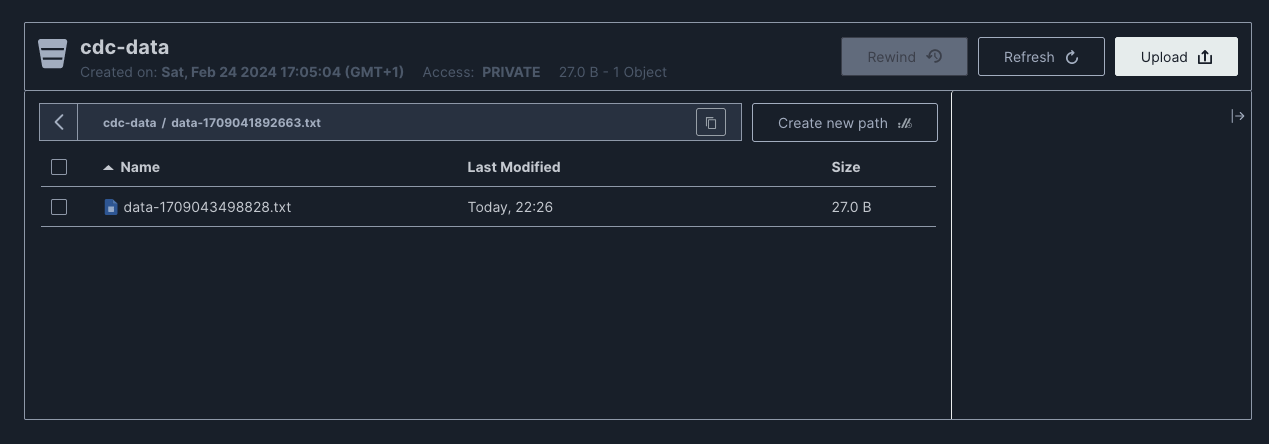
Message subscription in Redis
If storing the data is successful, the app publishes a message to a Redis channel (
nginxData) indicating that new data has been stored in MinIO. This allows other parts of the system subscribing to this Redis channel to be notified about new data.Open the RedisInsight interface and click on Subscribe in the Pub/Sub panel from the left-side menu. You should see a new messages published in the
nginxDatachannel:
Summary: System overview
This tutorial delineates a basic CDC system running on UCloud. The overall setup acts as a data ingestion and notification system, using MinIO for durable object storage, Redis for real-time data change notifications, and NGINX for data routing.
The Node.js application in the backend captures incoming data changes via HTTP POST requests to the /data endpoint and stores it in a MinIO bucket.
By using Redis for notifications, any number of subscribers can react to the data changes without being directly integrated with the source of the changes,
which is a key principle in scalable CDC systems.
While traditional CDC systems monitor changes to a database (inserts, updates, deletes), in this case, the changes are new data payloads received from external sources.
Contents