Deploying an Image Classifier on UCloud
This tutorial will guide you through setting up a Triton inference server on UCloud for image recognition and classification tasks. We will use the PyTorch app to create an InceptionV3 model, convert it to ONNX and TensorRT formats, and deploy it using the Triton Inference Server on UCloud. This setup allows us to handle inference requests efficiently using HTTP/REST, gRPC, or C API interfaces.
Disclaimer: This tutorial has been tested on Triton (TRT) version 24.08. Features, configurations, and behaviors may vary in different versions or with different setups.
Steps Overview
Define a PyTorch model for image classification.
Convert the model to ONNX and TensorRT formats.
Deploy the models on the Triton Inference Server.
Run performance tests using
perf_analyzerandmodel_analyzer.
Model Definition
In this example, we define a simple image classification model using PyTorch. To build and test the model, we'll start an instance of the PyTorch app on UCloud, selecting a machine type with at least one NVIDIA GPU, such as u3-gpu-1.
Creating the model directory structure
We need to create a directory structure to store our PyTorch, ONNX, and TensorRT models:
$ mkdir -p models/inception_v3-pytorch-model/1
$ mkdir -p models/inception_v3-onnx-model/1
$ mkdir -p models/inception_v3-trt-fp32-model/1/
$ mkdir -p models/inception_v3-trt-fp16-model/1/
PyTorch model definition
Here, we implement a pre-trained PyTorch model, instantiating the InceptionV3 model with weights trained on the ImageNet dataset.
The model is set to evaluation mode with .eval(), and allocated on the GPU with the .cuda() method:
import torch
from torch import nn
from torchvision import models


class Model(nn.Module):
    def __init__(self):
        super(Model, self).__init__()
        self.model = models.inception_v3(pretrained=True)

    def forward(self, x):
        return self.model(x)

model = Model().eval().cuda()
Model testing
To test the model, we first download the ImageNet labels. This can be done using the following Python lines of code:
import requests

url = "https://raw.githubusercontent.com/anishathalye/imagenet-simple-labels/master/imagenet-simple-labels.json"
response = requests.get(url)

# Save the content to a file
with open("imagenet-simple-labels.json", "wb") as file:
    file.write(response.content)
You can obtain sample images from the ImageNet dataset, for example, from here.
Next, we load and preprocess the image:
import numpy as np
from PIL import Image

image_file = "/path/to/image.jpg"

image = Image.open(image_file)
image
The InceptionV3 model expects input images to be of size 299x299 pixels. This size is required for the model to process the images correctly.
The images should also be normalized to have values between 0 and 1, and then further normalized using the mean and standard deviation values specific to the model's training dataset.
from torchvision import transforms

imagenet_mean = [0.485, 0.456, 0.406]
imagenet_std = [0.229, 0.224, 0.225]

# Load and preprocess an image
preprocess = transforms.Compose([
    transforms.Resize(299),
    transforms.CenterCrop(299),
    transforms.ToTensor(),
    transforms.Normalize(mean=imagenet_mean, std=imagenet_std),
])

input_tensor = preprocess(image)
Lastly, we'll apply our transformation pipeline to our image, add a dimension for our batch sizes with the .unsqueeze(0) method,
and allocate our image on the GPU with the .cuda() method.
We'll pass our image through our model to get the logits.
import json

input_batch = input_tensor.unsqueeze(0)  # Add batch dimension

# Move the input tensor to the GPU
input_batch = input_batch.cuda()

# Forward pass
with torch.no_grad():
    output = model(input_batch)

with open('imagenet-simple-labels.json') as file:
    labels = json.load(file)

# Get the predicted label
_, predicted_idx = torch.max(output, 1)
predicted_label = labels[predicted_idx.item()]
print(f"Predicted label: {predicted_label}")
Converting to TorchScript
We convert the PyTorch model to TorchScript, a format optimized for deployment.
For this, we define a wrapper around our model, set our model wrapper to evaluation mode, and allocate our model on the GPU.
We then generate our TorchScript code with the torch.jit.script function and write out our model as model.pt in the version 1 subdirectory of our inception_v3-pytorch-model model directory.
class PyTorch_to_TorchScript(nn.Module):
    def __init__(self, my_model):
        super(PyTorch_to_TorchScript, self).__init__()
        self.model = my_model.model

    def forward(self, x):
        return self.model(x)

torchscript_model = PyTorch_to_TorchScript(model).eval().cuda()
traced_script_module = torch.jit.script(torchscript_model)
traced_script_module.save('models/inception_v3-pytorch-model/1/model.pt')
Exporting to ONNX
We export the model to ONNX (Open Neural Network Exchange) format (model.onnx), which can be optimized and run on various platforms.
For this, we specify dummy input and the appropriate input and output names, we create a Torch Tensor of random data in the shape of our input images,
and allocate it on the GPU with the .cuda() method. We also pass a dictionary that maps the input and output names to which the size should correspond to the batch size.
Without using the dynamic_axes parameter, our ONNX model would be hardcoded to the batch size used for the dummy input,
which, in this case, is 1.
dummy_input = torch.randn(1, 3, 299, 299).cuda()

input_names = ['actual_input_1']
output_names = ['output1']

torch.onnx.export(model, dummy_input,
                  'models/inception_v3-onnx-model/1/model.onnx', verbose=False,
                  input_names=input_names, output_names=output_names,
                  dynamic_axes={'actual_input_1': {0: 'batch_size'}, 'output1': {0: 'batch_size'}})
Converting to TensorRT
Now, we take the ONNX representation and convert it to a TensorRT plan using the trtexec command line utility:
$ trtexec --onnx=models/inception_v3-onnx-model/1/model.onnx --optShapes=actual_input_1:16x3x299x299 --maxShapes=actual_input_1:32x3x299x299 --minShapes=actual_input_1:1x3x299x299 --shapes=actual_input_1:1x3x299x299 --saveEngine=models/inception_v3-trt-fp32-model/1/model.plan
By adding the --fp16 flag, we can specify that our TensorRT plan will be optimized for FP16.
There are a lot of benefits to using FP16, mainly of which is that it is faster (fewer computations) and uses less memory:
$ trtexec --onnx=models/inception_v3-onnx-model/1/model.onnx --optShapes=actual_input_1:16x3x299x299 --maxShapes=actual_input_1:32x3x299x299 --minShapes=actual_input_1:1x3x299x299 --shapes=actual_input_1:1x3x299x299 --saveEngine=models/inception_v3-trt-fp16-model/1/model.plan --fp16
Creating Triton configuration files
With our models defined and written out in different formats, we now turn our attention to creating the Triton configuration files for our models.
A minimal model configuration must specify the name of the model, the platform and/or backend properties, the max_batch_size property, and the input and output tensors of the model (name, data type, and shape).
configuration = """
name: "inception_v3-pytorch-model"
platform: "pytorch_libtorch"
max_batch_size: 32
input [
 {
    name: "input__0"
    data_type: TYPE_FP32
    format: FORMAT_NCHW
    dims: [ 3, 299, 299 ]
  }
]
output {
    name: "output__0"
    data_type: TYPE_FP32
    dims: [ 1000 ]
  }
"""

with open('models/inception_v3-pytorch-model/config.pbtxt', 'w') as file:
    file.write(configuration)
configuration = """
name: "inception_v3-onnx-model"
platform: "onnxruntime_onnx"
max_batch_size: 32
input [
 {
    name: "actual_input_1"
    data_type: TYPE_FP32
    format: FORMAT_NCHW
    dims: [ 3, 299, 299 ]
  }
]
output {
    name: "output1"
    data_type: TYPE_FP32
    dims: [ 1000 ]
  }
"""

with open('models/inception_v3-onnx-model/config.pbtxt', 'w') as file:
    file.write(configuration)
configuration = """
name: "inception_v3-trt-fp32-model"
platform: "tensorrt_plan"
max_batch_size: 32
input [
 {
    name: "actual_input_1"
    data_type: TYPE_FP32
    format: FORMAT_NCHW
    dims: [ 3, 299, 299 ]
  }
]
output {
    name: "output1"
    data_type: TYPE_FP32
    dims: [ 1000 ]
  }
"""

with open('models/inception_v3-trt-fp32-model/config.pbtxt', 'w') as file:
    file.write(configuration)
and
configuration = """
name: "inception_v3-trt-fp16-model"
platform: "tensorrt_plan"
max_batch_size: 32
input [
 {
    name: "actual_input_1"
    data_type: TYPE_FP32
    format: FORMAT_NCHW
    dims: [ 3, 299, 299 ]
  }
]
output {
    name: "output1"
    data_type: TYPE_FP32
    dims: [ 1000 ]
  }
"""

with open('models/inception_v3-trt-fp16-model/config.pbtxt', 'w') as file:
    file.write(configuration)
Testing the Model on Triton Server
Now let's start the Triton Inference Server on UCloud and mount the repository folder containing the models. In the following we consider a server with 4 NVIDIA H100 GPUs (machine type u3-gpu-4). We will verify that our models are ready by sending a curl request to the model endpoints:
$ curl -v localhost:8000/v2/models/inception_v3-onnx-model
This request returns status 200 if the model is ready. Additionally, it will display information such as the model's name, available versions, backend platform, inputs, and outputs.
Sending inference requests
To send inference requests to the Triton server, use the following Python script:
import tritonclient.http as tritonhttpclient

VERBOSE = False
input_name = 'actual_input_1'
input_shape = (1, 3, 299, 229)
input_dtype = 'FP32'
output_name = 'output1'
model_name = 'inception_v3-onnx-model'
url = 'localhost:8000'
model_version = '1'

triton_client = tritonhttpclient.InferenceServerClient(url=url, verbose=VERBOSE)
model_metadata = triton_client.get_model_metadata(model_name=model_name, model_version=model_version)
model_config = triton_client.get_model_config(model_name=model_name, model_version=model_version)
Next, we'll convert our previouly defined test image (currently as a Torch Tensor) to a NumPy array on the CPU. We define inputs and outputs to get the inference response:
image_numpy = input_batch.cpu().numpy()
input0 = tritonhttpclient.InferInput(input_name, input_shape, input_dtype)
input0.set_data_from_numpy(image_numpy, binary_data=False)

output = tritonhttpclient.InferRequestedOutput(output_name, binary_data=False)
response = triton_client.infer(model_name, model_version=model_version,
                               inputs=[input0], outputs=[output])
logits = response.as_numpy(output_name)
logits = np.asarray(logits, dtype=np.float32)

print(labels[np.argmax(logits)])
Performance Analyzer
A critical part of optimizing the inference performance of your model is being able to measure changes in performance as you experiment with different optimization strategies. The perf_analyzer application performs this task for the Triton Inference Server. It generates inference requests to the model and measures the throughput and latency of those requests.
To get representative results, perf_analyzer measures the throughput and latency over a time window, and then repeats the measurements until it gets stable values.
Here's how you can use it:
$ perf_analyzer -m inception_v3-onnx-model -b 1 --concurrency-range 1:1
Tip
...
Inferences/Second vs. Client Average Batch Latency
Concurrency: 1, throughput: 127.49 infer/sec, latency 7752 usec
$ perf_analyzer -m inception_v3-trt-fp32-model -b 1 --concurrency-range 1:1
Tip
...
Inferences/Second vs. Client Average Batch Latency
Concurrency: 1, throughput: 317.821 infer/sec, latency 3063 usec
$ perf_analyzer -m inception_v3-trt-fp16-model -b 1 --concurrency-range 1:4
Tip
...
Inferences/Second vs. Client Average Batch Latency
Concurrency: 1, throughput: 366.072 infer/sec, latency 2660 usec
Concurrency: 2, throughput: 582.808 infer/sec, latency 3334 usec
Concurrency: 3, throughput: 761.48 infer/sec, latency 3865 usec
Concurrency: 4, throughput: 857.696 infer/sec, latency 4601 usec
By default perf_analyzer uses average latency to determine stability but you can use the --percentile flag to stabilize results based on that confidence level.
For example, if --percentile=95 is used the results will be stabilized using the 95-th percentile request latency.
Model Analyzer
Triton Model Analyzer is a tool that uses Performance Analyzer to send requests to your model while measuring GPU memory and compute utilization. The Model Analyzer is specifically useful for characterizing the GPU memory requirements for your model under different batching and model instance configurations. Once you have this GPU memory usage information you can more intelligently decide on how to combine multiple models on the same GPU while remaining within the memory capacity of the GPU.
Example command:
$ model-analyzer profile \
      --triton-launch-mode=remote \
      --triton-http-endpoint=localhost:8000 \
      --model-repository=models \
      --profile-models=inception_v3-onnx-model \
      --output-model-repository-path=results-onnx-model \
      --gpus 0,1,2,3
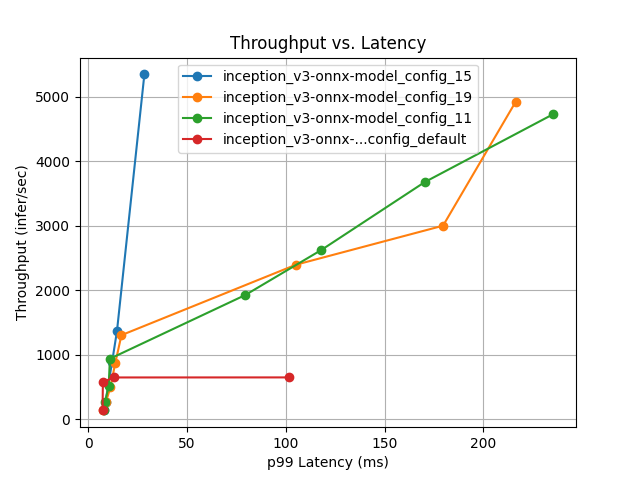
Comparing different ONNX configurations
In 196 measurements across 22 configurations, the best configuration (onnx_15) outperforms the default settings by 726% at maximizing the throughput on 4 x NVIDIA H100 80GB HBM3 GPUs.
The following table and plots summarize the results of model configuration and performance analysis:
Model Config Name |
Max Batch Size |
Dynamic Batching |
Total Instance Count |
p99 Latency (ms) |
Throughput (infer/sec) |
Max GPU Memory Usage (MB) |
Average GPU Utilization (%) |
|---|---|---|---|---|---|---|---|
|
4 |
Enabled |
16:GPU |
28.4 |
5343.5 |
3801 |
82.7 |
|
4 |
Enabled |
20:GPU |
216.3 |
4919.7 |
4341 |
78.2 |
|
4 |
Enabled |
12:GPU |
235.4 |
4728.9 |
3769 |
77.1 |
|
32 |
Disabled |
4:GPU |
101.5 |
646.5 |
2723 |
25.4 |

Best ONNX model configuration
This is the config.pbtxt file generated for the best model configuration (onnx_15):
name: "inception_v3-onnx-model"
platform: "onnxruntime_onnx"
max_batch_size: 4
input {
  name: "actual_input_1"
  data_type: TYPE_FP32
  format: FORMAT_NCHW
  dims: 3
  dims: 299
  dims: 299
}
output {
  name: "output1"
  data_type: TYPE_FP32
  dims: 1000
}
instance_group {
  count: 4
  kind: KIND_GPU
}
dynamic_batching {
}
Best TensorRT configurations
Similarly, we get the following summary results for the best TensorRT model formats discussed above:
In 184 measurements across 19 configurations, the best configuration (trt-fp32_2) is 4% better than the default configuration at maximizing throughput:
Model Config Name |
Max Batch Size |
Dynamic Batching |
Total Instance Count |
p99 Latency (ms) |
Throughput (infer/sec) |
Max GPU Memory Usage (MB) |
Average GPU Utilization (%) |
|---|---|---|---|---|---|---|---|
|
4 |
Enabled |
4:GPU |
9.62 |
9969.5 |
2516 |
99.8 |
|
32 |
Disabled |
4:GPU |
9.61 |
9563.8 |
2545 |
99.4 |
with the best model configuation:
name: "inception_v3-trt-fp32-model"
platform: "tensorrt_plan"
max_batch_size: 4
input {
  name: "actual_input_1"
  data_type: TYPE_FP32
  format: FORMAT_NCHW
  dims: 3
  dims: 299
  dims: 299
}
output {
  name: "output1"
  data_type: TYPE_FP32
  dims: 1000
}
instance_group {
  count: 1
  kind: KIND_GPU
}
dynamic_batching {
}
In 169 measurements across 18 configurations, the best configuration (trt-fp16_3) is 9% better than the default configuration at maximizing throughput:
Model Config Name |
Max Batch Size |
Dynamic Batching |
Total Instance Count |
p99 Latency (ms) |
Throughput (infer/sec) |
Max GPU Memory Usage (MB) |
Average GPU Utilization (%) |
|---|---|---|---|---|---|---|---|
|
8 |
Enabled |
4:GPU |
10.5 |
9720.0 |
3622 |
98.1 |
|
32 |
Disabled |
4:GPU |
54.0 |
8903.5 |
3647 |
98.2 |
with the best model configuation:
name: "inception_v3-trt-fp16-model"
platform: "tensorrt_plan"
max_batch_size: 8
input {
  name: "actual_input_1"
  data_type: TYPE_FP32
  format: FORMAT_NCHW
  dims: 3
  dims: 299
  dims: 299
}
output {
  name: "output1"
  data_type: TYPE_FP32
  dims: 1000
}
instance_group {
  count: 1
  kind: KIND_GPU
}
dynamic_batching {
}
Contents