Airflow Basics
As explained in the Airflow documentation, Apache Airflow is an open-source Python framework designed for developing, scheduling, and monitoring batch-oriented workflows. Leveraging Python code to represent workflows, Airflow facilitates dynamic pipeline generation, connectivity with various external systems, and flexible parameterization through Jinja templating.
In the following sections, we will cover key concepts and the basics of setting up a workflow.
For additional information, see the official Airflow documentation.
DAGs
A graphical representation of a typical workflow, known as a Directed Acyclic Graph (DAG), appears as follows:
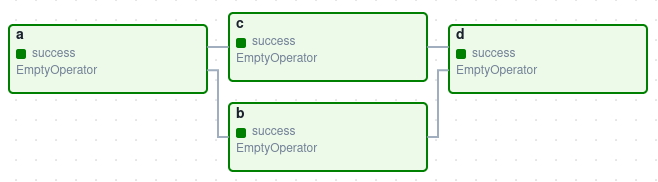
DAGs are the core concept of Airflow and consist of a collection of tasks, organized to reflect their relationships and dependencies. This organization specifies how, when, and in what order the tasks should execute.
In the image above, each node of the graph (represented as a box) represents a task, while each edge represents the relationships or dependencies between those tasks. The direction of execution flows from left to right.
Note
The use of DAGs implies that a task cannot depend on itself, either directly or indirectly. This ensures that once a task is completed, it cannot be revisited, thereby preventing infinite loops.
Declaration of a DAG
DAGs can be declared in three different ways:
import datetime

from airflow import DAG
from airflow.operators.empty import EmptyOperator

# Example 1: Using a context manager
with DAG(
    dag_id="my_dag_name",
    start_date=datetime.datetime(2021, 1, 1),
    schedule_interval="@daily",
):
EmptyOperator(task_id="task")

# Example 2: Standard constructor
my_dag = DAG(
    dag_id="my_dag_name",
    start_date=datetime.datetime(2021, 1, 1),
    schedule_interval="@daily",
)
EmptyOperator(task_id="task", dag=my_dag)

# Example 3: Decorator
@dag(start_date=datetime.datetime(2021, 1, 1), schedule_interval="@daily")
def generate_dag():
    EmptyOperator(task_id="task")

generate_dag()
Note
When using the standard constructor, the user must explicitly refer to the DAG in each task definition by passing the dag parameter. For example: EmptyOperator(task_id="task", dag=my_dag).
Tasks
Each task represents an individual unit of work, which can range from executing a simple Bash or Python script to more complex operations like sending HTTP requests or executing SQL commands.
Tasks can depend on other tasks (upstream dependencies) or be responsible for initiating subsequent tasks (downstream dependencies).
There are three common types of tasks:
Operators: Predefined tasks (or templates) that can be easily connected together to form a workflow. They perform specific actions, such as running a Bash command, executing a Python function, or interacting with external systems. The most common operators are
BashOperatorandPythonOperator, but a more complete list can be found in the official documentation. Some of them come pre-built with Airflow's core, but others have to be installed via extra providers (also called packages).Sensors: A specialized type of operators that wait for an external event to happen before proceeding with the next task. For example, a sensor might wait for a file to appear in an S3 bucket or for a specific time to be reached.
Taskflow: A decorated function in Python that is packaged as a task using the Taskflow API. This approach uses the
@taskdecorator to define regular Python functions as tasks. While it can be more complex and has a steeper learning curve, it reduces boilerplate code and improves readability and modularity.
Control flow
Individual dependencies among tasks are represented using operators (<<, >>, []), and methods (set_upstream() and set_downstream()):
<<: Equivalent toset_upstream(), establishes that the task on the left should run before the task on the right.>>: Equivalent toset_downstream(), establishes that the task on the right should run after the task on the left.[]: Can also be used similarly to>>, but is particularly handy for specifying multiple dependencies.
Note
The main difference between operators and methods, is that operators provide a concise way to define task dependencies, whereas methods offer flexibility when declaring multiple dependencies or adjusting them dynamically after DAG initialization.
Some examples are:
first_task >> [second_task, third_task] # first_task runs before second_task and third_task
third_task << fourth_task # fourth_task runs after third_task has completed
Referring to the DAG shown prevously:
a >> [b, c]
d << b # Alternatively: d << [b, c]
d << c
By default, a task waits for all its upstream tasks to succeed before it starts. However, this behavior can be customized to handle different scenarios, such as triggering a task on upstream failure instead of success.
For more complex dependencies like cross dependencies or chains, methods like cross_downstream() or chain() can be used. Refer to the Airflow documentation for more details.
Airflow Components
The following diagram shows Airflow's different components:
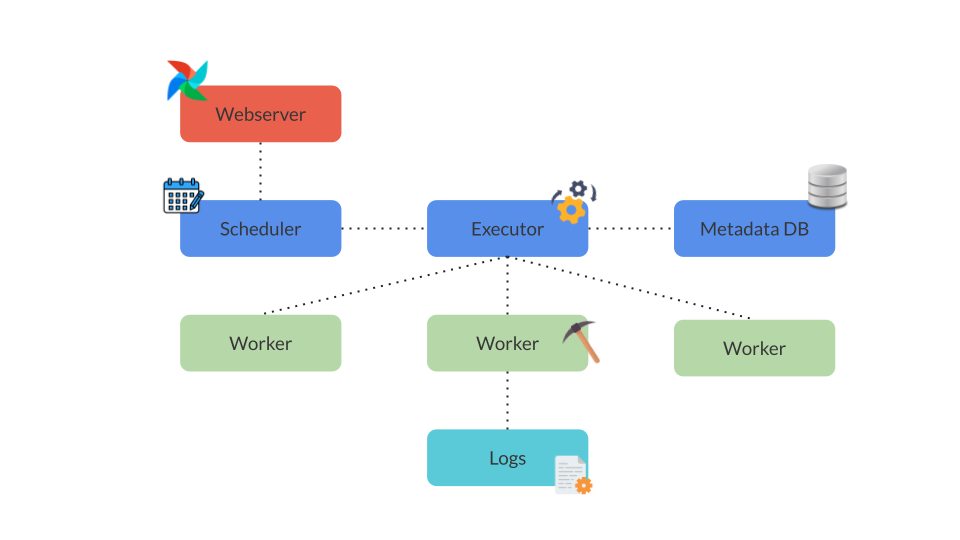
Scheduler: The scheduler is the process responsible for triggering scheduled workflows (DAGs) and submiting tasks for the executor to run based on predefined schedules, trigger rules, priorities, and other factors. It continuously monitors DAGs and their task dependencies to ensure tasks are executed in the correct order. To start the scheduler, run:
$ airflow scheduler
Executor: The executor is a configuration property of the scheduler which runs within the scheduler process. It determines how tasks within a DAG are executed and it is responsible for running the tasks either locally or on a distributed set of worker nodes, depending on the chosen executor type. Airflow supports several executor types:
SequentialExecutor: Executes tasks sequentially in a single process.LocalExecutor: Executes tasks in parallel locally on the same machine, suitable for development and small-scale deployments.CeleryExecutor: Executes tasks in parallel using Celery, a distributed task queue. For a detailed example, see the Airflow Celery use case The choice of executor significantly impacts task distribution, execution scalability, resource utilization, and overall Airflow performance. By default, Airflow is configured to useSequentialExecutor
Webserver: The webserver provides a user-friendly interface that allows users to inspect, trigger, and debug DAGs and tasks. It serves as the primary interface to view DAG runs, task statuses, execution logs, and scheduling details. Additionally, the Webserver enables manual triggering of DAGs and provides administrative functions for managing connections, Airflow variables, and plugins. To start the webserver, run:
$ airflow webserver
Creating a Workflow
An example of an ETL pipeline is shown below:
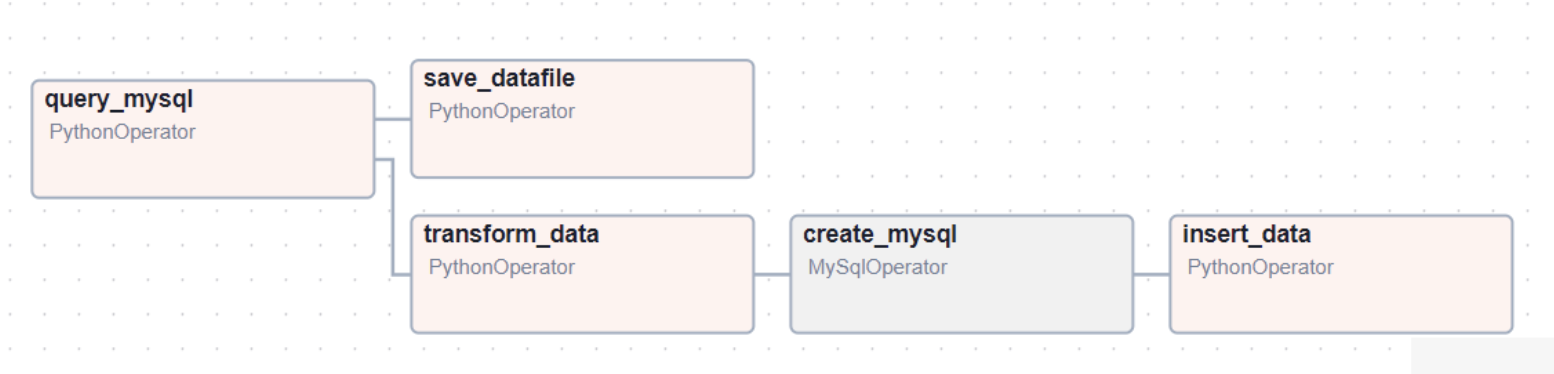
This workflow consists of the following steps:
Extract: Query a database to retrieve data from a specified table.
Transform: Modify the retrieved data by removing a specific column.
Load: Save the transformed dataset in two locations simultaneously: a
.csvfile and a new table within the same database.
The following subsections provide instructions for executing this example workflow in Airflow, from setting up the MySQL database to connecting the jobs and running the code. Details about each part of the DAG are also provided below.
Set up MySQL
Before starting the Airflow App, a MySQL Server must be configured and running:
Create a MySQL server job on UCloud. Make sure you save the password, since it will be used in the following steps.
Create a database (also called a schema in MySQL) with a name of your choice and select it:
mysql> CREATE DATABASE <your-db-name>;
mysql> USE <your-db-name>;
Create a table to work with. In this example, it will have the name
iris.mysql> CREATE TABLE `iris` ( id INT AUTO_INCREMENT PRIMARY KEY, sepal_length FLOAT, sepal_width FLOAT, petal_length FLOAT, petal_width FLOAT, species VARCHAR(50) );
Populate the table with the Iris dataset.
You can do so by downloading the
.csvusingwgetinto/var/lib/mysql-files/:$ wget https://gist.githubusercontent.com/curran/a08a1080b88344b0c8a7/raw/0e7a9b0a5d22642a06d3d5b9bcbad9890c8ee534/iris.csv -P /var/lib/mysql-files/
And inserting the contents with an
LOAD DATA INFILEstatement:mysql> LOAD DATA INFILE '/var/lib/mysql-files/iris.csv' INTO TABLE iris FIELDS TERMINATED BY ',' ENCLOSED BY '"' LINES TERMINATED BY '\n' IGNORE 1 LINES (sepal_length, sepal_width, petal_length, petal_width, species);
Connect to MySQL
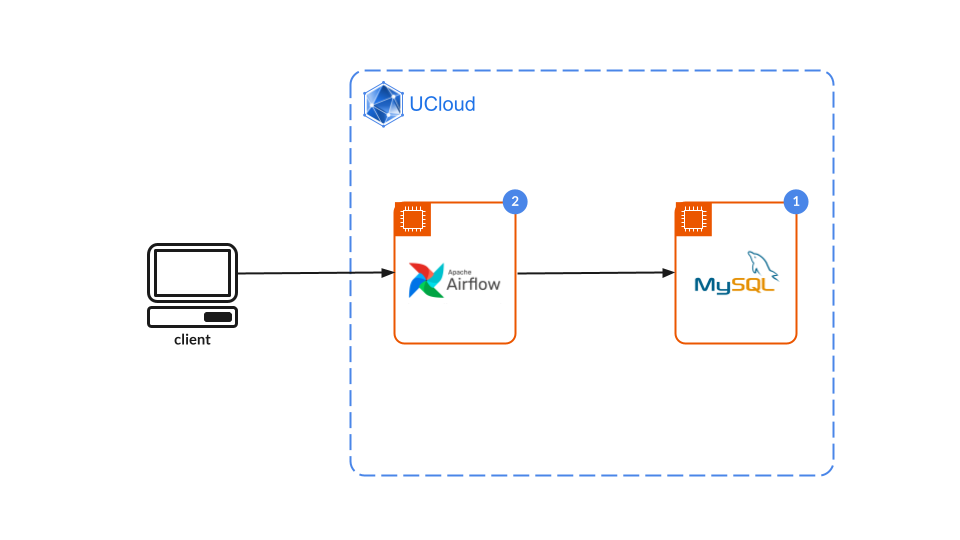
Now that the database is created and the data available, a connection must be established between the MySQL server job and a new Airflow instance:
In the Airflow job parameters, connect to the MySQL Server job using the connect to job parameter. Choose a hostname.
Start the Airflow job and add the connection via CLI
$ airflow connections add <connection-id> \
    --conn-type 'mysql' \
    --conn-login <your-mysql-user> \
    --conn-password <your-mysql-password> \
    --conn-host <your-mysql-hostname> \
    --conn-port '3306' \
    --conn-schema <your-schema> # In MySQL, 'schema' is used interchangeably with 'database'
DAG execution
Before running the DAG, ensure that the dags/ directory exists within your AIRFLOW_HOME directory in the Airflow job. If it doesn't exist, create it.
Inside the dags/ directory, you will need to add two files:
create_mysql.sql: This script is used to create a new table within your MySQL database:CREATE TABLE IF NOT EXISTS new_iris ( id INT AUTO_INCREMENT PRIMARY KEY, sepal_length FLOAT, petal_length FLOAT, petal_width FLOAT, species VARCHAR(50) );
A Python Script: This file will contain the code for the Airflow workflow (DAG):
from airflow import DAG
from airflow.operators.mysql_operator import MySqlOperator
from airflow.hooks.mysql_hook import MySqlHook
from datetime import datetime, timedelta
from airflow.operators.python_operator import PythonOperator
import pandas as pd

# Functions needed in the tasks
def query_mysql():
    hook = MySqlHook(mysql_conn_id='mysql')
    connection = hook.get_conn()
    cursor = connection.cursor()
    cursor.execute('SELECT * FROM iris WHERE species = "setosa";')
    result = cursor.fetchall()
    cursor.close()
    connection.close()
    df = pd.DataFrame(data=result, columns=["id","sepal_length","sepal_width","petal_length","petal_width","species"])
    return df # The return statement sends information to the next task using XComs

def transform_data(**kwargs): # **kwargs receives the information from the previous task and makes it accessible
    ti = kwargs['ti']
    df = ti.xcom_pull(task_ids='query_mysql')
    df.drop(columns=['sepal_width', 'id'], inplace=True)
    return df

def save_datafile(**kwargs):
    ti = kwargs['ti']
    df = ti.xcom_pull(task_ids='query_mysql')
    df.to_csv('/work/updated_iris.csv', index=False)

def insert_data(**kwargs):
    ti = kwargs['ti']
    df = ti.xcom_pull(task_ids='transform_data')
    hook = MySqlHook(mysql_conn_id='mysql')
    connection = hook.get_conn()
    cursor = connection.cursor()

    for _, row in df.iterrows():
        insert_query = """
        INSERT INTO new_iris (sepal_length, petal_length, petal_width, species)
        VALUES (%s, %s, %s, %s)
        """
        cursor.execute(insert_query, tuple(row))

    connection.commit()
    cursor.close()
    connection.close()


dag = DAG(
    'ETL_example',
    # These args will get passed on to each operator
    # You can override them on a per-task basis during operator initialization
    default_args={
        "depends_on_past": False,
        "retries": 1,
        "retry_delay": timedelta(minutes=5),
    },
    description='A simple ETL example using basic operators',
    schedule_interval=timedelta(days=1),  # Set to None to trigger manually
    start_date=datetime(2021, 1, 1),
    catchup=False,
    tags=["ucloud_example"],
)

# Task 1
task_query_mysql = PythonOperator(
    task_id='query_mysql',
    python_callable=query_mysql,
    dag=dag,
)

# Task 2
transform_data_task = PythonOperator(
    task_id='transform_data',
    python_callable=transform_data,
    provide_context=True,  # Enables passing a dictionary of context variables (**kwargs) to the function. For more details, see XComs.
    dag=dag,
)

# Task 3
save_datafile_task = PythonOperator(
    task_id='save_datafile',
    python_callable=save_datafile,
    provide_context=True,
    dag=dag,
)

# Task 4
create_mysql = MySqlOperator(
    task_id='create_mysql',
    mysql_conn_id='mysql',
    sql='create_mysql.sql',  # path relative to dags folder
    dag=dag,
)

# Task 5
insert_data_task = PythonOperator(
    task_id='insert_data',
    python_callable=insert_data,
    provide_context=True,
    dag=dag,
)

# Establish task dependencies
task_query_mysql >> transform_data_task
task_query_mysql >> save_datafile_task
transform_data_task >> create_mysql >> insert_data_task
Note
In the script, a MySqlHook is used in two tasks to provide provide a more dynamic and customizable way to interact with the database, allowing for complex queries and operations. This differs from the MySqlOperator, which executes predefined SQL scripts or commands and cannot handle complicated queries programmatically (nor the SELECT statement). For more information, refer to the Airflow documentation.
To run the DAG, press the Play button in the UI, or execute the following command from the job's terminal window:
$ airflow dags trigger ETL_example
For more information refer to the Execution and monitoring section.
DAG parameters
The code defines a DAG using a context manager with the ID ETL_example. Below is a detailed explanation of the parameters and components used in the DAG:
default_args: Default arguments applied to all tasks within the DAG. Defining them here avoids repetitive code. The provided example includes:depends_on_past: Set toFalse, ensuring tasks do not depend on previous runs.retries: Set to 1, indicating the number of retry attempts if a task fails.retry_delay: Set totimedelta(minutes=5), specifying the delay between retries.
description: A textual description of the DAG, displayed in the Airflow web interface.schedule_interval: Specifies the interval at which the DAG runs. In this example, it is set to run once a day (timedelta(days=1)).start_date: Mandatory argument indicating the start date from which the DAG is available to run. In this example, it is set todatetime(2021, 1, 1).catchup: When set toFalse, the DAG will not perform backfilling (running the DAG for missing past dates).tags: Used to organize and filter DAGs in the Airflow web interface. Tags are displayed below the name and description of the DAG.
Note
Airflow offers extensive configuration options for defining the behavior of DAGs and tasks. While some configurations are generally considered mandatory for defining a functional DAG in Airflow, the exact set of required parameters can vary based on the complexity and specific requirements of the DAG and its tasks.
Task definitions
Within the context, five tasks are defined using BashOperator, PythonOperator and MySqlOperator:
task_query_mysql: A task namedquery_mysqlwhich runs a Python function (defined at the top of the script) to query the Iris dataset from a MySQL database. This function is called using the parameterpython_callableand returns a dataframe for the next task to use.transform_data_task: A task namedtransform_datawhich runs a Python function that takes the previous dataframe and does a simple transformation by dropping two columns and returning the modified dataframe to the next task. To be able to receive arguments from other tasks, it is necessary to enable the passing of context variables(**kwargs)to the function using theprovide_context=Trueparameter. For more details, see the XComs documentation.save_datafile_task: A task namedsave_datafilewhich runs a Python function to save the dataframe into a.csvfile. This task also allows passing context variables to the function usingprovide_context=True.create_mysql: A task namedcreate_mysqlwhich runs an SQL scriptcreate_mysql.sqlusing theMySqlOperator. Themysql_conn_idparameter specifies the connection ID to a MySQL database (for setup instrucctions, refer to the Spark use case), and thesqlparameter specifies the path to the SQL script relative to the DAGs folder. This script includes aCREATEstatement to create a table for the Iris dataset, excluding the two columns dropped by the transformation taskinsert_data_task: A task namedinsert_datawhich runs a Python function that takes the dataframe and inserts it into the newly created table fromcreate_mysql. This task also enables passing context variables to the function.
Task dependencies
The dependencies between tasks are established using the >> operator. In this example:
task_query_mysqlis the initial task and it serves as the upstream task for bothtransform_data_taskandsave_datafile_task. This means thattransform_data_taskandsave_datafile_taskwill only begin execution aftertask_query_mysqlhas finished successfully. Since both tasks are independent of each other and dependent oftask_query_mysql, they will be executed concurrently.After
transform_data_taskcompletes, it triggers thecreate_mysqltask.Finally, once the
create_mysqltask is done creating a table for the transformed Iris dataset, theinsert_data_taskwill run.
Scheduling
To define how often a DAG should be triggered, the schedule_interval parameter is used. Its values can be either a cron expression, a datetime.timedelta object, or a cron preset. An example of each type of value for a daily run of a DAG is shown below:
from airflow.models.dag import DAG
import datetime

dag = DAG("regular_interval_cron_example", schedule_interval="0 0 * * *", ...)

dag = DAG("regular_interval_cron_preset_example", schedule_interval="@daily", ...)

dag = DAG("regular_interval_timedelta_example", schedule_interval=datetime.timedelta(days=1), ...)
The scheduler creates a DAG run for every completed interval, starting from an initial start_date until (optionally) an end_date. A newly scheduled DAG run will not execute until the first interval is completed, but it is possible to execute a newly scheduled DAG immediately by setting a start_date in the past (by default, Airflow will start any unexecuted DAG with a past start_date). Unless it is intended, this should be avoided, as it creates a big amount of unnecessary runs. This behaviour can also be disabled by setting catchup=False.
Note
When catchup is enabled (which is, by default), Airflow will create DagRun instances for all the missed periods since the start date or the last run.
External script execution
In Airflow, it is common to call scripts located in different directories to help maintain modular and organized code. The execution of scripts can be easily done by using BashOperator. For example:
run_script = BashOperator(
    task_id='run_bash_script',
    bash_command='sh /path/to/your/script.sh;',
    dag=dag,
)

run_python_script = BashOperator(
    task_id='run_python_script',
    bash_command='python /path/to/your/script.py;'
)
Dynamic generation
While the simplest way to create a DAG in Apache Airflow is to write it as a static Python file, this approach is not scalable for complex workflows. Python's flexibility allows for dynamic DAG creation using loops, functions, and conditional logic. DAGs can be dynamically generated by using external sources such as databases, APIs, or configuration files (e.g., JSON or YAML). For example:
from datetime import timedelta
from airflow import DAG
from airflow.operators.dummy_operator import DummyOperator

# List of tasks to create dynamically
task_ids = ['task1', 'task2', 'task3']

# Create a DAG object
dag = DAG(
    'dynamic_dag_example',
    default_args=default_args,
    description='A dynamically generated DAG example',
    schedule_interval=timedelta(days=1),
    tags=["ucloud_example"],
)

# Dynamically create tasks based on the list
for task_id in task_ids:
    if task_id == 'task1':
        # First task doesn't depend on any other task
        task = DummyOperator(
            task_id=task_id,
            dag=dag,
        )
    else:
        # Subsequent tasks depend on the previous task
        task = DummyOperator(
            task_id=task_id,
            dag=dag,
        )
        # Set task dependencies
        previous_task >> task

    # Update the previous task to the current task for the next iteration
    previous_task = task
Another way to dynamically generate workflows is by using Jinja templating, which is based on runtime parameters and conditions: DAGs can be parameterized and templates can be rendered at execution time.
from datetime import datetime, timedelta
from airflow import DAG
from airflow.operators.python_operator import PythonOperator
from jinja2 import Template

# Define a function to print a message
def print_message(**kwargs):
    execution_date = kwargs['execution_date']
    name = 'Alice'

    # Jinja template for the message
    message_template = Template("Hello, {{ name }}! Today is {{ execution_date.strftime('%Y-%m-%d') }}.")

    # Render the message with the context
    message = message_template.render(name=name, execution_date=execution_date)
    print(message)

# DAG definition
dag = DAG(
    'jinja_example_dag',
    default_args=default_args,
    description='A DAG example demonstrating Jinja templating',
    schedule_interval=timedelta(days=1),
    tags=["ucloud_example"],
)

# Task using Jinja templating
task1 = PythonOperator(
    task_id='print_hello',
    python_callable=print_message,
    dag=dag,
)
Execution and Monitoring
DAGs are typically executed according to a set schedule, but they can also be run manually via the Command Line Interface (CLI) or the webserver UI. This section covers how to execute DAGs manually, monitor task status, and view log files, both from the CLI and the UI.
Task status
Depending on what stage of execution they are in, tasks will have different statuses. Having a general idea of them is crucial for monitoring and troubleshooting workflows.
None: Initial state when a task's execution has not started yet.
Scheduled: Task is scheduled to run in the future based on the defined schedule.
Queued: Task is waiting in the queue to be executed by an available worker.
Running: Task is currently being executed by a worker.
Success: Task has successfully completed its execution without encountering any errors.
Failed: Task has completed its execution, but encountered errors during the process.
Upstream failed: Task cannot run because one or more of its upstream tasks have failed.
Skipped: Task is intentionally skipped, typically due to conditional logic or external triggers. Skipping does not cause the overall pipeline to fail.
Retry: Task is being retried according to its configured retry policy after a previous failure.
Up for Retry: Task has failed and is awaiting preparation for retry.
Paused: Task or DAG execution has been manually paused, preventing scheduling and execution until unpaused.
Queued for Re-run: Task is queued for re-execution, but will only be rerun if the
rerun_failed_tasksoption is enabled.
Contents