Airflow's Celery Executor: Distributed Task Execution
Solely relying on connections to external systems (for example, using SparkSubmitOperator to submit jobs to a Spark cluster or SSHOperator to execute commands on remote machines) has limitations with regards to scalability, resource and dependency management, and can cause bottlenecks when faced with high volumes of tasks.
CeleryExecutor provides a more scalable and fault-tolerant solution by distributing tasks across multiple worker nodes within the Airflow environment. This setup enhances overall performance and reduces bottlenecks, although it requires a more complex configuration and ongoing management. For efficiently handling large volumes of tasks and diverse workflows, CeleryExecutor is generally the preferred choice.
Note
Spark clusters are specialized systems optimized for Spark jobs and large-scale data processing. In this aspect, CeleryExecutor offers flexibility, allowing for a wide range of task types beyond just data processing.
Celery and CeleryExecutor
To understand how CeleryExecutor works, it's important to first understand Celery. Celery is a task queue designed to handle a large number of asynchronous tasks. It manages and distributes work (tasks) across threads or machines (workers) using a message broker.
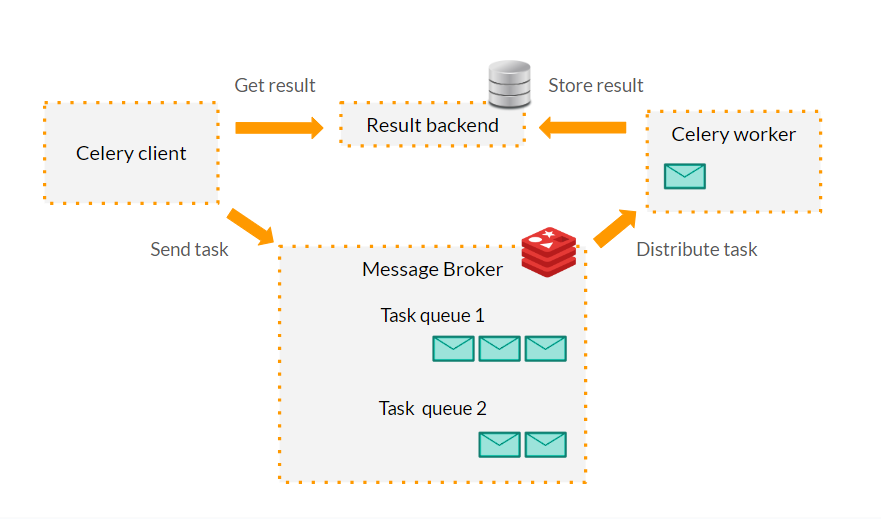
CeleryExecutor integrates Celery with Apache Airflow, enhancing workflow management. When Airflow's scheduler determines that tasks are ready to run, it sends these tasks to a Celery task queue. The message broker (e.g., RabbitMQ or Redis) then queues these tasks and delivers them to workers. This setup allows Airflow to scale task execution horizontally and ensures fault-tolerance by rerouting tasks if a worker fails.
General Setup
To enable CeleryExecutor in Airflow a Celery backend must be set up and specific Airflow and Celery settings must be modified:
Celery Backend: A message broker such as RabbitMQ or Redis has to be installed and configured.
Airflow configuration: Under the
[core]section of theairflow.cfgfile, theexecutorsetting has to be set toCeleryExecutor.Celery specific settings: Under the
[celery]section of theairflow.cfgfile, setbroker_urlto the address of the message broker and set aresult_backendwhere the task states and results will be stored.Additional Celery settings: Under the
[celery]section of theairflow.cfg, some optional settings regarding concurrency, workers, tasks, logging and task routing can be configured.
For more information on these settings, refer to the Airflow Official Documentation.
Main Node Configuration
When launching a new Airflow job in UCloud, the running instance already has Redis installed and configured to work with Airflow. Therefore, by default, you only need to specify in the job parameters that the Airflow Core Executor is set to CeleryExecutor.
However, there are a few important considerations:
Any specific Celery configuration must be added via de
airflow.cfgfile. This can be done by using an existing configuration file during the job setup or by modifying theairflow.cfgfile inside the instance after the job has started.There is no Result Backend specified. This means that Celery will default to using an in-memory backend which is generally not suitable for production use since it does not persist task results. This can also be changed in the
airflow.cfgfile.
Worker Node Configuration
In order to ensure worker nodes are able to pick up and execute tasks, some requirements must be met:
Airflow needs to be installed on the worker nodes, and the CLI must be in the system path. This ensures that
airflowcommands can be executed to start and stop workers.Airflow configuration settings must be consistent across all nodes.
Workers must have all necessary dependencies installed and configured to execute the tasks assigned to them. This includes Python packages, system libraries, and any other required software.
Workers must have access to the
DAGS_FOLDERand ensure it is synchronized across all nodes. This allows workers to fetch and execute the latest DAG definitions.
More on these requirements in the official documentation.
To ensure that configuration and DAGs are consistent accross nodes (and that DAGs are syncronized), all worker nodes must mount the AIRFLOW_HOME directory using the Add folder job parameter.
To install Airflow and the needed dependencies, an initialization script can be used. The following subsection provides an example. To list all providers installed in the main node, use:
$ airflow providers list
Additionally, all UCloud jobs that will be used as worker nodes must be connected to the main Airflow job. The hostname set for the main Airflow instance will be used to connect to the metadata database and the message broker.
Note
In this case, setting up workers requires for the workers to connect to the main node, in contrast to when connectors and external systems are used (see e.g., the Spark use case), which require the main node to connect to the other jobs.
Airflow installation
The script below outlines the basic steps for installing Airflow on a worker node. It is intended as a general guide rather than a definitive solution. For more information visit Airflow's official installation guide.
#!/bin/bash

# Update package lists and install dependencies
sudo apt-get -y update

# Python installation (if needed)
sudo apt-get install python<python-version> # For example, python3.12

# Airflow dependencies
sudo apt-get -y update
sudo apt-get install python3-dev libmysqlclient-dev build-essential pkg-config libldap2-dev libsasl2-dev unixodbc -y

# Set Airflow environment variables
echo "export AIRFLOW_HOME=/work/Airflow" >> ~/.bashrc # Mounted Airflow home folder
echo "export AIRFLOW__DATABASE__SQL_ALCHEMY_CONN=postgresql+psycopg2://airflow_user:airflow_pass@<airflow-hostname>:5432/airflow_db" >> ~/.bashrc
echo "export AIRFLOW__CELERY__BROKER_URL=redis://<airflow-hostname>:6379" >> ~/.bashrc
echo "export AIRFLOW__CORE__EXECUTOR=CeleryExecutor" >> ~/.bashrc
# ...

source ~/.bashrc

# Install Python dependencies
pip install <dependencies>

# Install Airflow
pip install "apache-airflow[<list-of-providers>]==<your-airflow-version>" --constraint "https://raw.githubusercontent.com/apache/airflow/constraints-<your-airflow-version>/constraints-<python-version>.txt"
When specifying the Python version in the constraint file, use only the major and minor version numbers. For example, for Python 3.12.4, specify 3.12.
Note
When installing Airflow, ensure that the versions of Airflow and Python are compatible and match those of the main Airflow node. Incompatibilities can lead to installation issues or runtime errors. For more information refer to the official documentation.
Launching workers
When everything is properly installed and configured, workers can be launched with the following command:
$ airflow celery worker
To stop the worker, use:
$ airflow celery stop
Note
By default, when CeleryExecutor is being used, the main node does not execute tasks; it only queues them. If the user wants the main node to execute tasks (as it does with other executors), run the worker command on the main node as well.
Using multiple queues
One of Celery's powerful features is its ability to support multiple queues, allowing tasks to be organized and processed based on priority, type, or other criteria. This enables better utilization of available resources, as different workers can be dedicated to different queues.
In Airflow, queues can be defined in the DAG's configuration using the queue parameter. Each task in the DAG can be assigned to a specific queue. For example:
exampleTask = DummyOperator(
    task_id='exampleTask',
    queue='queue1' # A name of your choice
)
By default, all tasks are assigned to the default queue, which is specified in airflow.cfg under the [operators] section. When using the queue parameter, the default queue is overridden for that task, meaning it can only be executed by workers who are listening to that specific queue. Celery workers in Airflow can be configured to listen to specific queues using the following command:
$ airflow celery worker --queues queue1,default
In this example, the worker listens to both the queue1 and default queues, allowing it to handle tasks from either queue.
Example Workflow
The following example is closely related to the ETL_Example in the Airflow Basics documentation and makes use of the same MySQL Database, connection, and create_mysql.sql file. See here for detailed setup instructions.
There are a few important considerations:
Shared directory for files: Ensure that the directory where files are saved is shared among all worker nodes. Otherwise, the file will remain local to the worker that executed the task.
Queue management: Ensure that there is at least one worker node listening to each queue, including the default one.
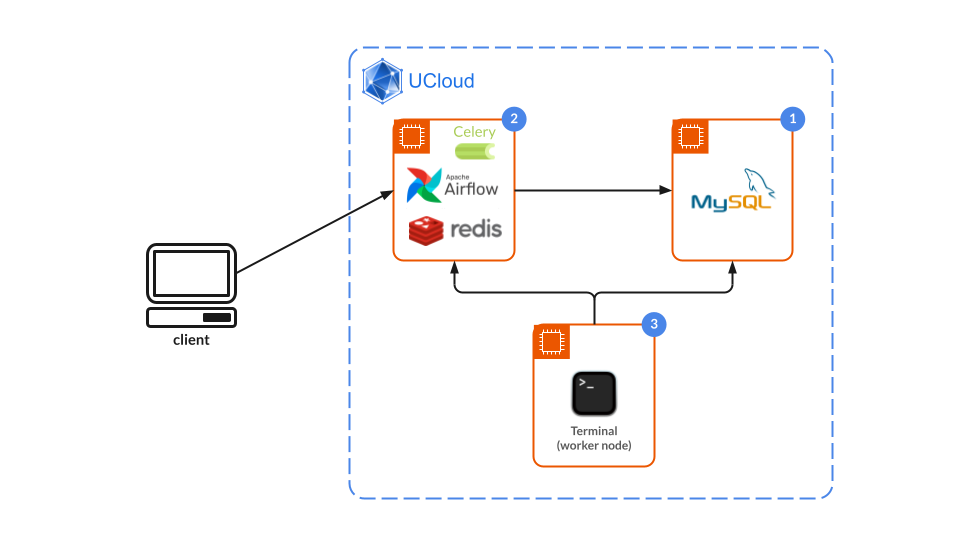
Terminal setup
For this example, an Airflow job must be running and connected to a MySQL Server. The worker in this case can be any UCloud application, such as Terminal. Be sure to mount the $AIRFLOW_HOME directory with the Add folder option.
Before starting the Terminal job, connect it to the running Airflow and MySQL Server jobs.
Install Airflow in the Terminal instance. In this case,
mysqlclientandpyarrowalong with the following providers must also be installed:$ pip install mysqlclient, pyarrow $ pip install "apache-airflow[celery,pandas,postgres,redis,spark,mysql]==<your-airflow-version>" \ --constraint "https://raw.githubusercontent.com/apache/airflow/constraints-<airflow-version>/constraints-<python-version>.txt"
Since the example workflow uses queues, start the celery worker by specifying which queue it should listen to:
$ airflow celery worker --queues transform_queue
Airflow node setup
In the previous subsection, the worker node was configured to listen to only one queue - the transform_queue. This leaves the default queue without any workers to send the tasks to. For this reason, the main Airflow node will also be used as a worker.
Opening a new Airflow job terminal window, start the worker:
$ airflow celery worker
Note
If no queue is specified, the worker will listen to the default queue.
Running the DAG
Add the following python script into the dags/ folder:
from airflow import DAG
from airflow.operators.mysql_operator import MySqlOperator
from airflow.hooks.mysql_hook import MySqlHook
from datetime import datetime, timedelta
from airflow.operators.python_operator import PythonOperator
import pandas as pd

# Functions needed in the tasks
def query_mysql():
    hook = MySqlHook(mysql_conn_id='mysql')
    connection = hook.get_conn()
    cursor = connection.cursor()
    cursor.execute('SELECT * FROM iris WHERE species = "setosa";')
    result = cursor.fetchall()
    cursor.close()
    connection.close()
    df = pd.DataFrame(data=result, columns=["id","sepal_length","sepal_width","petal_length","petal_width","species"])
    return df # The return statement sends information to the next task using XComs

def transform_data(**kwargs): # **kwargs receives the information from the previous task and makes it accessible
    ti = kwargs['ti']
    df = ti.xcom_pull(task_ids='query_mysql')
    df.drop(columns=['sepal_width', 'id'], inplace=True)
    return df

def save_datafile(**kwargs):
    ti = kwargs['ti']
    df = ti.xcom_pull(task_ids='query_mysql')
    df.to_csv('/work/Airflow/data/updated_iris.csv', index=False) # Directory where the file is saved is shared among the workers and the main node

def insert_data(**kwargs):
    ti = kwargs['ti']
    df = ti.xcom_pull(task_ids='transform_data')
    hook = MySqlHook(mysql_conn_id='mysql')
    connection = hook.get_conn()
    cursor = connection.cursor()

    for _, row in df.iterrows():
        insert_query = """
        INSERT INTO new_iris (sepal_length, petal_length, petal_width, species)
        VALUES (%s, %s, %s, %s)
        """
        cursor.execute(insert_query, tuple(row))

    connection.commit()
    cursor.close()
    connection.close()


dag = DAG(
    'ETL_Celery_example',
    # These args will get passed on to each operator
    # You can override them on a per-task basis during operator initialization
    default_args={
        "depends_on_past": False,
        "retries": 1,
        "retry_delay": timedelta(minutes=5),
    },
    schedule_interval=timedelta(days=1),  # Set to None to trigger manually
    start_date=datetime(2021, 1, 1),
    catchup=False,
    tags=["ucloud_example"],
)

# Task 1
task_query_mysql = PythonOperator(
    task_id='query_mysql',
    python_callable=query_mysql,
    dag=dag,
)

# Task 2
transform_data_task = PythonOperator(
    task_id='transform_data',
    python_callable=transform_data,
    provide_context=True,  # Enables passing a dictionary of context variables (**kwargs) to the function. For more details, see XComs.
    queue="transform_queue", # We add this task to a different queue
    dag=dag,
)

# Task 3
save_datafile_task = PythonOperator(
    task_id='save_datafile',
    python_callable=save_datafile,
    provide_context=True,
    dag=dag,
)

# Task 4
create_mysql = MySqlOperator(
    task_id='create_mysql',
    mysql_conn_id='mysql',
    sql='create_mysql.sql',  # path relative to dags folder
    dag=dag,
)

# Task 5
insert_data_task = PythonOperator(
    task_id='insert_data',
    python_callable=insert_data,
    provide_context=True,
    dag=dag,
)

# Establish task dependencies
task_query_mysql >> transform_data_task
task_query_mysql >> save_datafile_task
transform_data_task >> create_mysql >> insert_data_task
To run the DAG, press the Play button in the UI, or run the following command from the job's terminal window:
$ airflow dags trigger ETL_Celery_example
In this example, the directory where the .csv file is stored after the save_datafile_task is executed is modified from being in the /work directory to being stored in the $AIRFLOW_HOME/ directory. Nevertheless, it can be any folder as long as the folder is accessible to all relevant nodes.
Lastly, a specific queue is added just for the transform_data_task. This ensures that only a specific set of worker nodes can execute it, providing better resource management, scalability (adding more workers if the task is not being completed fast enough) and stability for the rest of the tasks, as they are not affected by a resource-heavy operation.
Contents