Real-Time Data Streaming with Node.js
This tutorial delves into the development of a real-time data streaming application on UCloud using Node.js, showcasing how to serve streaming data over HTTP long polling and configure NGINX as a reverse proxy to manage access efficiently.
Overview: System Architecture
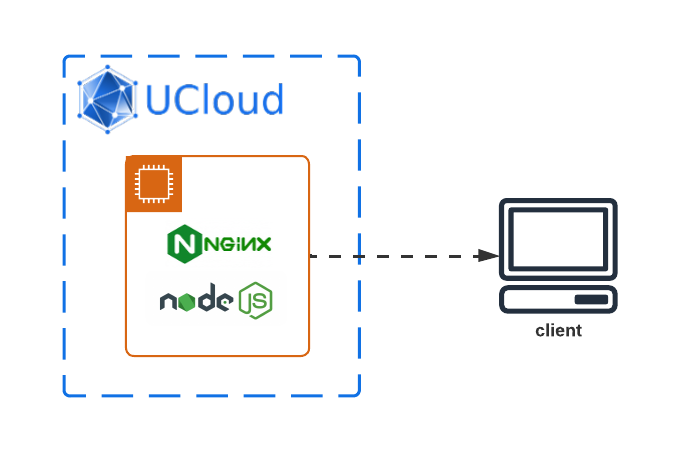
The architecture of this system is designed to efficiently handle live data streams from UCloud and make them accessible through a web interface. Below are the key components of the system architecture:
NGINX Server: Acts as the primary gateway for incoming data streams as well as hosting the Node.js application. It is adeptly configured to facilitate HTTP connections and functions as a reverse proxy, channeling incoming data towards the Node.js application for subsequent processing.
Node.js Application: Hosted on the NGINX server and is tasked with the reception and processing of real-time data streams. Unlike traditional handling and processing roles, this application provides a dedicated endpoint that clients can interact with to fetch streaming data, effectively serving as a bridge between the data source and the end-users.
Data Source: In this architecture, the data source is co-located with the NGINX server. This configuration simulates scenarios where the NGINX server directly accumulates data streams, from either internal operations or through setups permitting data intake from external entities.
The integration of NGINX and Node.js on the same server simplifies the architecture and minimizes latency, making it an ideal setup for scenarios requiring real-time data processing and minimal response times.
Initialization: Setting up NGINX
Start a new NGINX web server on UCloud with a public link.
In this tutorial we will attach the URL: app-datastreams.cloud.sdu.dk.
Streaming Setup: Building with Node.js
We will use Express to create an HTTP server that clients can poll for data.
Set up the project
Open the NGINX terminal interface and initialize the Node.js project:
$ mkdir data-stream && cd data-stream
$ npm init -y
$ npm install express
Implement the data generator
Let's start by creating a simple data generator. This component simulates real-time data generation, like sensor readings or stock market prices.
Change to the project directory, open a terminal editor and create a new file named dataGenerator.js with the following content:
function generateData() {
    // Example: Generate a random number to simulate data
    return Math.floor(Math.random() * 100);
}

module.exports = generateData;
This function simulates data generation by producing a random integer. You can tailor this function to fit the specific data streaming needs.
Implement the Application
Create a file server.js in the project directory:
const express = require('express');
const generateData = require('./dataGenerator');
const app = express();

app.get('/stream', (req, res) => {
    // Set headers for keeping the connection open and streaming data
    res.setHeader('Content-Type', 'text/event-stream');
    res.setHeader('Cache-Control', 'no-cache');
    res.setHeader('Connection', 'keep-alive');

    // Function to send data
    const sendEvent = () => {
        const data = generateData();
        res.write(`data: ${JSON.stringify(data)}\n\n`);
    };

    // Send data every second
    const interval = setInterval(sendEvent, 1000);

    // Clean up when the connection is closed
    req.on('close', () => {
        clearInterval(interval);
        res.end();
    });
});

const PORT = 3000;
app.listen(PORT, () => console.log(`Server running on port ${PORT}`));
This server listens on port 3000 and provides a route /stream that clients can request to receive streaming data. The data is sent using Server-Sent Events (SSE).
Run the application
Start the Node.js server:
$ nohup node server &
The application runs in background.
NGINX Integration: Reverse Proxy Setup
Configure NGINX to forward HTTP requests to the Node.js application, enabling external access to the data stream.
Open the NGINX configuration file for editing:
/etc/nginx/nginx.conf.Modify the server block to reverse proxy requests as in the example below:
# /etc/nginx/nginx.conf
worker_processes auto;
error_log /dev/stdout info;
pid /var/run/nginx.pid;

events {
    worker_connections 1024;
}

http {
    log_format main '$remote_addr - $remote_user [$time_local] "$request" '
                    '$status $body_bytes_sent "$http_referer" '
                    '"$http_user_agent" "$http_x_forwarded_for"';

    access_log /var/log/nginx/access.log main;

    server {
        listen 8080 so_keepalive=on;

        location / {
            proxy_pass http://localhost:3000;
            proxy_http_version 1.1;
            proxy_set_header Connection "";
            proxy_buffering off;
            proxy_cache off;
            proxy_set_header Host $host;
            proxy_set_header X-Real-IP $remote_addr;
            proxy_set_header X-Forwarded-For $proxy_add_x_forwarded_for;
            proxy_set_header X-Forwarded-Proto $scheme;
        }
}

}
This configuration ensures NGINX forwards requests to
/streamcorrectly, supporting the SSE protocol by disabling buffering.Reload NGINX to apply the changes:
$ nginx -t
$ nginx -s reload
Testing: Validating the Setup
Access the streaming data by visiting https://app-datastreams.cloud.sdu.dk/stream in a web browser or using a tool like curl:
$ curl https://app-datastreams.cloud.sdu.dk/stream
You should see streaming data being sent from the server, displayed in your local terminal window or browser.
Summary: Key Takeaways
We have created a data streaming application on UCloud using HTTP long polling, with NGINX configured as a reverse proxy. This approach is suitable for scenarios where real-time interaction is needed, offering broad compatibility and straightforward implementation.
Contents